Database
Intro to Forms DBs and Grids
Intro to Forms DBs and Grids
You can use Info Select to enter structured data. For example you could use structured data to:
- Take phone messages
- Prepare purchase orders
- Conduct surveys
- Manage invoices
- Duplicate paper forms electronically
Info Select offers three structured data types: Forms, Databases, and Grids. All are composed of fields. Info Select supports fields for entering text, numbers, dates, currency and images, and also checkboxes and list fields for storing multiple values.
When you enter data, you create a record. A record represents one set of data. For example, in the following data Mary Jones and her address represent one record.
| John Smith | 123 Main St. | Anytown USA 12345 |
| Mary Jones | 456 South St | Othertown USA 98765 |
| George Brown | 100 North St. | Yourtown USA 55555 |
Each structured data type has its own advantages:
| Type | Advantages |
| Form |
|
| Database |
|
| Selector Grid |
|
Tip: Click above links to learn more about each structured data type.
Forms
Forms
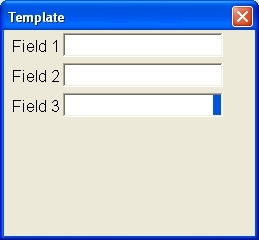
You can design a Form to hold structured information. For example, you can keep invoices in Forms, where you have specific fields for customer name, invoice number, etc.
[:] To design a Form:
- Choose Menu Ribbon | Insert | Form. You will see a form Icon
 in the Selector.
 - Type a Form name and press ENTER. The name will appear in the Template pull-down menu.
- In the Workspace, design the Form to your specifications per Modifying Fields.
- To set the Form background color, in the Workspace, outside of any field, right-click on the Form and choose Background Color.
The form you just designed is the Master from which copies will be made when the Form is used. Any changes you make to the Master Form will be reflected in all subsequent uses of the Form. The master Form shows an icon ![]() of a drop down menu. Don’t enter data into the Master Form – if you do you will see the same data in every new Record.
of a drop down menu. Don’t enter data into the Master Form – if you do you will see the same data in every new Record.
You can enter a record of data using your Form. For example, if you designed an Invoice Form you can invoke the Form to create a new invoice.
[:] To enter data into a Form:
- From the Template menu, select the desired Form. The Form will appear in the Workspace.
- Enter data into the first field. Press TAB to move to the next field or SHIFT + TAB to go to the previous field. You can also click in any field in the Workspace to move to that field.
- Press ESC when finished editing.
- Enter a caption for the completed Form unless you want the same name as the Master.
Time, Date, and Sequence Stamps
Within your Form, you can designate fields to automatically display the current time, date, or sequence number when the Form is selected.
[:] To create time, date and sequence stamps:
- In the original Form, enter @T for the time, @D for the date, or @K for a sequence number in the field where you want each displayed.
Automatic Address Recognition
You can setup a Form so it automatically recognizes an address in a Note and transfers the address into a field inside the Form. For example, if you have designed your Form as a form letter, the address from a highlighted Note can be transferred automatically into the address field of the letter.
[:] To setup automatic address recognition:
- In the original Form, enter @A where the address should appear.
[:] To use a form with automatic address recognition:
- In the Selector, choose the Note with the address.
- From the Template menu, select the Form. A copy of the Form will appear in the Workspace, displaying the address at the designated location.
In order to be recognized as an address, an address must have 3 to 5 lines with each line consisting of 7 to 40 characters. Furthermore, the address must close with a zip code of 1 or more digits or a single quotation mark after a non-numeric zip code. If there is more than one address in the Note, Info Select will use the first address.
Supplied Forms
Info Select comes with pre-designed Forms which can be tailored to fit your needs. The more commonly used Forms are found in the Template Topic, and can be accessed from the Template menu. Additional forms can be found in the Supplied Topics.wd2 file.
Tips & Hints
To add fixed text to a Form, such as instructions about how to fill out a form, create a new field, enter the fixed text, and change the background color of the field so it matches the background color of the Form.
You can have the caption in the Selector reflect the information in one of the fields – see Managing Fields.
Databases
Databases
A Database in Info Select is a way to store structured information comprised of fields and records. A Database is represented by a square tri-colored icon ![]() in the Selector. You can design a Database to hold the same kind of structured information as a Form.
in the Selector. You can design a Database to hold the same kind of structured information as a Form.
[:] To design a Database:
- Choose Menu Ribbon | Insert | Database | Database. You will see a Database icon
 in the Selector.
 - Type a Database name and press ENTER.
- In the Workspace, design the Database to your specifications per section Fields.
Each entry in a Database is a Record. Records are shown as small, tri-colored icons ![]() . You add a record whenever you need to enter additional data.
. You add a record whenever you need to enter additional data.
[:] To add a new Record to a Database:
- In the Selector, choose the Database.
- Choose Menu Ribbon | Database | Record
- Click inside any fields and enter data into the field.
- When finished entering data press ESC.
Alternatively, you can right-click on the Database item in the Selector and choose Add Record. The new record will be inserted after the last record. Choose Insert Record to create a new record above the currently selected record.
Field and Record Views
You can expand or collapse a Database. When expanded you can view a list of the fields of the Database or a list of the Records of the Database. You can select which of these two views you need.
[:] To choose between Field and Record view:
- In the Selector, click on the
 icon near the Database caption.
The Field view is used to design or modify the Database. In Field view, below the Database icon you will see field type icons: ![]() – text field,
– text field, ![]() – number field,
– number field, ![]() – date field,
– date field, ![]() – currency field,
– currency field, ![]() – list field,
– list field, ![]() – check field or
– check field or ![]() – image field. Click here for more information about the various field types. Next to these icons will be the field name, such as Address or City. You can step thru data Records even while the Fields are listed.
– image field. Click here for more information about the various field types. Next to these icons will be the field name, such as Address or City. You can step thru data Records even while the Fields are listed.
[:] To browse through Records while in Field view:
- Press the PLUS or MINUS keys on your keyboard.
The Record view is generally used while entering and viewing data. In Record view, each icon below the main ![]() Database icon represents one record of data (e.g., John Doe, Mary Smith, Etc.). The information shown in the caption of each Record is the information inside the field that is currently selected. You can choose which field is displayed for Record captions.
Database icon represents one record of data (e.g., John Doe, Mary Smith, Etc.). The information shown in the caption of each Record is the information inside the field that is currently selected. You can choose which field is displayed for Record captions.
You can sort Database Records alphabetically or numerically.
[:] To Sort a Database:
- From the Selector, choose the Database.
- Choose Menu Ribbon | Home | Tools | Sort…. The Sort dialog box appears.
- Select the Field you want to sort.
- Select whether to sort in Ascending or Descending order.
- Click OK.
Joining Two Databases
You can join (merge together) two Databases. For example, you may have a Database with personal telephone numbers and another with business telephone numbers. You can join them into one Database that contains all your telephone numbers.
[:] To join two Databases:
- In the Selector, position the two Databases so one is directly below the other.
- Highlight the top Database.
- Choose Menu Ribbon | Selector | Join. The layout of the Database on top will take precedence. If there is any difference in the field names or types between the two Databases, you will be given the option to add the extra fields of the second Database to the first Database. If the first Database doesn’t contain the same fields as the second database, extra fields in the second Database will be deleted. Alternatively, you may simply drag one Database into another. The layout of the Database into which you are dragging takes precedence.
Calculations
You can find the maximum value, minimum value, average and sum of any fields that contain numbers in a Database.
[:] To view numeric field totals:
- In the Selector, right-click the Database and choose Totals. A new Note will be created below the Database showing numeric field totals.
Cloning a Database
You can create a new empty Database based on the format of an existing one.
[:] To create a new empty Database based on the format of an existing one:
- Select and collapse the Database.
- Choose Menu Ribbon | Home | Copy and Menu Ribbon | Home | Paste to duplicate the Database.
- Expand the Database.
- If the Database is in the Field View, switch it into Record View by clicking on the icon near the Database caption.
- Press DELETE and confirm. This will remove all the records contained in the Database copy but will keep the field structure.
- Enter a caption for the new Database.
Tips & Hints
You can change some other types of Info Select data into a Database and vice versa. For example, you can change an Info Select Form into a Database.
You can drag a field from one Database into another if the two Databases have the same number of Records or if the destination database contains one or no Records. If the destination Database has one Record, that Record will be duplicated to create the same number of Records as the source Database.
Fields
Fields
Fields are the building blocks of Forms, Databases, and Grids. The following field types are available:
|
Icon |
Field Name | Field Data Type |
|
|
Text field | Can hold words, phrases, or numbers. |
|
|
Numeric field | Can hold only numbers. |
|
|
Date field | Can hold only dates. Press ENTER while editing the Date field to select a date from a pop-up Calendar. |
|
|
Currency field | Can hold only currency amounts. |
|
|
List field | Can hold pre-defined values accessible from a drop-down list. To select a value type the first letter of the value name. |
|
|
Check field | Can be checked or unchecked. |
|
|
Image field | Can hold an image. Paste an image into this field, or right-click and choose Import Image…, or draw an image directly in the field. |
Note: The format of Date and Currency data is controlled via the Regional Settings in Windows | Settings | Control Panel.
[:] To define values of a List field:
- Right-click on the List field in the Selector or Workspace and choose Edit Values…. A dialog box appears:
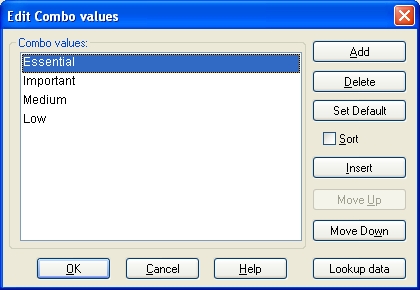 Click Add to create a new value. Click Delete to delete a value. Click Move Up or Move Down to move the selected list values up or down in the list. Check Sort to have list values sorted alphabetically.
Click Insert to insert the new value into the list. Click Default to set the selected item as Default List value. This value will be automatically inserted into all new records. - Click OK.
There are several ways of inserting an image into the Image field.
[:] To add images to the Image field:
- Right-click on the Image field in the Selector or Workspace and choose Import Image… . A dialog box appears.
- Select the image from the list and click Insert.
or …
- Paste the image from clipboard by clicking in the Image field in the Workspace and choosing Edit | Paste. You may be prompted to resize the image canvas, if the pasted image doesn’t fit to the current canvas.or…
- Draw the image directly in the Image field. Click here for the information on drawing in Info Select. Note, that the image toolbar is not available when editing the Image field.
Tip: You can edit the image which was imported into the Image field.
Adding Fields
You can add fields to Forms or Databases. For example, you might want to add a Home E-mail Address field to an address Database.
[:] To add a field to a Form or Database:
- In the Selector, expand the Form or Database. If you see
 icon(s) indicating Record view, switch to Field view by double-clicking a Record.
 - Choose Menu Ribbon | Database | Field and choose a field type. Alternatively, right-click on the Form or Database and choose Insert Field… from the pop-up menu.
- In the Selector, type the name of the field (e.g. Last Name) and press ENTER. You will see a box appear in the Workspace with a caption to the left.
- Select the desired field background color by right clicking inside the field box in the workspace.
- Set the desired field size. Move the mouse cursor over the edge of the field until it turns into a double-headed arrow. Hold down the left mouse button and drag to the desired size.
- Move the field to the desired position on the screen. Place your cursor in the colored area on the right edge of the field, hold down the left mouse button, and drag the field to the desired location.
You can set the order that data is entered into fields.
[:] To set the order information is entered into a Form, Database, or Grid:
- In the Selector, double-click a Record to select field view if needed.
- Adjust the order of the fields in the Selector by dragging them with your mouse. The first field listed in the Selector will correlate to the first field where data should be entered. The second field in the Selector will correlate to the second field where data should be entered, and so on. This allows you to fill out a Form in a chosen order. (The order of fields in the Workspace does not determine the order of data entry.)
You can delete a field
[:] To delete a field:
- In the Selector, double click a Record to choose field view if needed.
- In the Selector, choose the field and press DELETE.
[:] To specify which Form field(s) show their contents in the Selector:
In Selector, in the caption of the Form Template, specific form, Database, or e-mail, enter the caption name followed by two colons: then the field name(s) inside ‘s. For example, “E-Mail:: , ” (without the quotes) will show the contents of the “From” and “Subject” fields in the Selector. The caption “E-Mail” will appear when the item is expanded. This also works for the Database items.
You can specify that a specific field should fill all available space in the Workspace. For example, the Message field of an e-mail form fills all unused space on the e-mail form.
Avoiding shifting of fields
If a Form or Database is wider than the Workspace, a scrollbar will be displayed. In some situations, using the scrollbar will effect a permanent shift in the fields. To avoid this, select the Database and choose Menu Ribbon | Edit | Properties | Disable Fields Moving/Deleting.
Selector Grids
Selector Grids
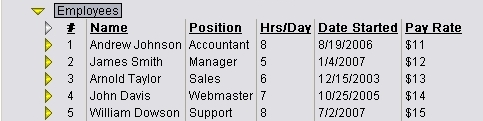
Selector Grids allow you to create tables in the Selector for organizing structured information. Each row in a Selector Grid is a Topic. You can use Selector Grids for schedules, business plans, employees information, purchases, etc.
The image below shows an example of using a Selector Grid for storing employee information. Each row in such grid contains the employee’s name, position, number of hours he works per day, starting date and the pay rate. Each row can be expanded to store additional free-form information about the corresponding employee.
[:] To create a new Selector Grid:
- Choose Menu Ribbon | Insert | Grid in Selector | Grid in Selector.
A new Selector Grid with 3 rows and 3 columns will be created.
[:] To edit a cell in a Selector Grid:
- Click on the cell.
- Press F2 to start editing.
- Make the necessary changes.
- Press ENTER to finish editing.
To navigate between Selector Grid cells use the ARROW keys.
[:] To add a new column to a Selector Grid:
- Click on a cell in the Grid.
- Choose Menu Ribbon | Insert | Grid in Selector | Add Selector Column. A new column will be added to the right of the last column.
[:] To insert a new column into a Selector Grid:
- Click on a cell in the Grid.
- Choose Menu Ribbon | Insert | Grid in Selector | Insert Selector Column. A new column will be added to the left of the selected cell.
[:] To add a new row to a Selector Grid:
- Click on a row in the Selector Grid.
- Choose Menu Ribbon | Insert | Topic (F11). A new row will be created below the selected row.
Tip: To create a header for a Selector Grid, enter column names into the first row and set it’s font style to bold underlined .
[:] To delete data from a Selector Grid:
- Click on a cell.
- Press the DELETE key. A dialog box appears.
- Select the appropriate option and click OK.
[:] To copy data from a Selector Grid:
- Click on a cell.
- Choose Menu Ribbon | Home | Copy. A dialog box appears.
- Select the appropriate option and click OK.
[:] To clear data from a Selector Grid column:
- Right-click in a column you wish to clear.
- Choose Clear Column.
[:] To sort a Selector Grid column:
- Right-click in a column you wish to sort.
- Choose Sort Column.
[:] To join two Selector Grid columns:
- Right-click in a column you wish to join with the adjacent column.
- Choose Join Two Columns. The selected column will be joined with the column to the right.
[:] To move the Selector Grid column left or right:
- Right-click in a column you wish to you wish to move.
- Choose Move Column Left (Right).