Searching
Intro to Searching
Intro to Searching
Info Select provides a powerful search capability that allows you to find information quickly. You can use any of these type of searches:
| Type of search | Finds items |
| Exact phrase including spaces | containing a particular word or phrase |
| Item size range | containing a certain number of characters or bytes |
| Date range | containing dates within a specific range |
| Item modification date range | last edited within a specific range of dates |
| Boolean expression | containing text which matches a Boolean search condition |
The Search Dialog Box
The Search Dialog Box
The Search dialog box is the mechanism you use to find things in Info Select. The dialog appears when you issue the Menu Ribbon | Home | Search (F5) command.
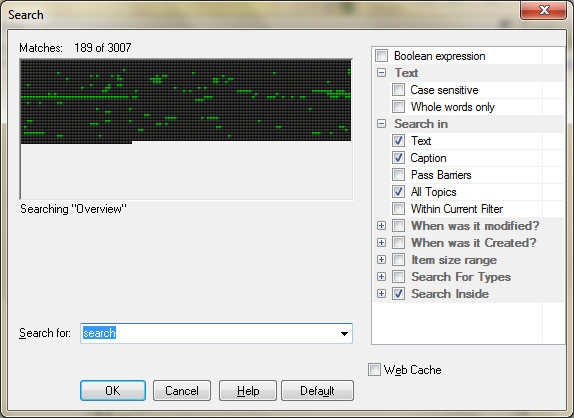
The Search dialog box allows you to specify a word or phrase to find.
You can see a graphical representation of a search in the Search Map which displays a series of squares. Each colored square represents an item in the Selector. As you type in your search phrase, the search will narrow and you will see the colored squares gradually disappear. The remaining squares represent the items that match the search phrase. The number of matches is displayed in the Matches area above the Search Map. The size of the squares varies with the amount of information being searched.
You can retrieve previous searches by pressing the DOWN ARROW key. You can also use the drop-list button next to the Search for field and select a previous search from a list.
You can highlight a word in a Note or caption while editing and then invoke the Search command. That word will automatically be copied into the Search key box.
You can specify a case sensitive search by checking the Case Sensitive checkbox. When unchecked, both “Apple” and “apple” will be found, regardless of how the item was originally entered.
If you want to search for whole words, check Whole Words Only.
You can specify that you want to search the information shown in the Selector by checking the Captions checkbox. You can specify that you want to search the Workspace by checking the Text checkbox.
Search Barriers prevent items from being searched. When you place a Search Barrier (marked by ![]() icon) on an item, searches will exclude that item. If you want to ignore Search Barriers and search through all items, check the Pass Barriers checkbox. Otherwise, leave the checkbox unchecked to allow Search Barriers to work as intended.
icon) on an item, searches will exclude that item. If you want to ignore Search Barriers and search through all items, check the Pass Barriers checkbox. Otherwise, leave the checkbox unchecked to allow Search Barriers to work as intended.
Check All Topics to search all your data. Uncheck All Topics for a localized search of just the selected Topic.
You can search for the information in the Filtered items by checking the Within Current Filter option. For example, you can search for “John Smith” and then search the found items for the word “invoice” to located invoices from John Smith.
The Search for Type and Search Inside sections are explained in “Item Type Searching”.
Exact Phrase Searching
Exact Phrase Searching
You can search items for an exact word, phrase, or number. For example, if you were a journalist and needed all your notes about Senator Smith, you could perform an Exact phrase search for the words “Senator Smith”.
[:] To perform an Exact Phrase search:
- Choose Menu Ribbon | Search (F5). The Search dialog box appears.
- In the Search for box, enter the word, phrase or number you want to find.
- Press ENTER. The items found by the search will be shown in the Selector and the Search Filter will be activated. The matching words or numbers will be highlighted inside the found items.
- You can choose Edit | Find Next or press F3 to step through matches.
- After viewing the search results, choose Menu Ribbon | Filter | View All Items (F4) to view your unfiltered data.
Size Searching
Size Searching
You can find items based on the number of characters they contain. For example, you might want to find all items larger than 10,000 characters.
[:] To search by size:
- Choose Menu Ribbon | Home | Search (F5). The Search dialog box appears.
- Check the Item size range box and expand it by clicking the “+” icon.
- Enter Minimum and Maximum size values into the appropriate fields under the Item size range option.
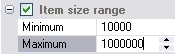
- Press ENTER. The items found by the search will be shown in the Selector and the Search Filter will be activated.
- After viewing the search results, choose Menu Ribbon | Home | Filter | View All Items (F4) to view your unfiltered data.
Date Range Searching
Date Range Searching
You can find all items created within a certain period. For example, a lawyer could find case notes created between certain dates.
[:] To search by date range:
- Choose Tools | Search (F5). The Search dialog box appears.
- Check the When was it Created box and expand it by clicking the “+” icon
- Enter the desired dates into the To and From fields manually or click drop-down box at the right side of the appropriate field to select a date from the calendar.
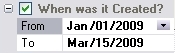
- Press ENTER. The items found by the search will be shown in the Selector and the Search Filter will be activated. The matching dates will be highlighted inside the found items.
- After viewing the search results, choose Menu Ribbon | Home | Filter | View All Items (F4) to view your unfiltered data.
Date Property Searching
Date Property Searching
You can find items by the last date they were edited. For example, a salesperson might want find (to discard) all sales leads from five years ago.
[:] To perform a Date Changed Search:
- Choose Tools | Search (F5). The Search dialog box appears.
- Check When was it modified and expand by clicking the “+” icon.
- Enter the desired dates into To and From fields manually or click the drop-down box at the right side of the appropriate field to select a date from the calendar.
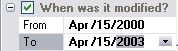
- Press ENTER. The items found by the search will be shown in the Selector and the Search Filter will be activated.
- After viewing the search results, choose Menu Ribbon | Home | Filter | View All Items (F4) to view your unfiltered data.
Boolean Searching
Boolean Searching
A Boolean search is a special type of search that allows you to use “and”, “or” and “not” in your searches. For example, you can search for all the notes containing “John Smith orInvoice”.
[:] To perform a boolean search:
- Choose Menu Ribbon | Home | Search (F5).
- Check the Boolean expression box.
- In the Search for box enter the Expression (see examples below).
- Press ENTER. The items found by the search will be shown in the Selector and the Search Filter will be activated. The matching words or numbers will be highlighted inside the found items.
- After viewing the search results, choose View | View All Items (F4) to view your unfiltered data
Examples
In the examples below keywords and special characters used in are bolded.
|
Simple Expressions |
|
| Search String | Action |
| Apples and Oranges | Searches for all items containing the words “Apples” and “Oranges”. |
| Apples or Oranges | Searches for all items containing the word “Apples” or the word “Oranges”. |
| not Oranges | Searches for all items which don’t contain the word “Oranges”. Note, that the not keyword should be placed before the search string. |
|
Complex Expressions |
|
| Search String | Action |
| “John Smith“ and (letter or message) | Searches for all items containing the exact phrase “John Smith” (without the quotes), and the words “letter” or “message”. Here, the quote characters “” are used to specify the exact phrase. The parentheses characters ( and ) set the order of the Boolean operations. |
| not “Green Apples“ and Oranges | Searches for all items which don’t contain the exact phrase “Green Apples” and contain the word “Oranges”. |
| “\”in computers\”” | Searches for the exact phrase “in computers” including the quotes. Use the \ character to suppress the meaning of the special characters. For example, to include into the search string a ( or ) character, use \(. Use \t to search for the Tab character. |
| “Dimensions: \(inch\) \t” | Searches for the exact phrase “Dimensions: (inch)” (without the quotes), and a Tab character after the closing parentheses. |
Note: Space characters are ignored anywhere except inside of the quoted string.
Tip: You can use &, | and ! characters instead of and, or and not keywords respectively
Search Barriers
Search Barriers
While searching in Info Select you can exclude certain Topics from being searched. For example you might have stored some old data that you do not want to delete but you do not want such data considered when searching, because it would clutter your search results with irrelevant matches.
[:] To hide a Topic from searches:
- In the Selector, choose the Topic and collapse it.
- Choose Menu Ribbon | Edit | Properties | Search Barrier and click OK. An icon of a crossed binoculars
 will appear in the Selector next to the item.
Note: A Topic marked with a Search Barrier can still be searched by initiating the search from inside the Topic or by selecting Pass Barriers in the Search dialog box.
To remove a Search Barrier repeat the above steps.
Searching the web cache
Searching the web cache
The web cache is the temporary files stored by your browser while browsing the internet. You can search your web cache. For example, you may have visited several web pages containing information pertinent to a project and you want to find those web pages by searching for text you saw on those pages.
[:] To search the web cache:
- Choose Menu Ribbon | Home | Search.
- In the Search for box, enter the text you want to search for.
- Check the Web cache box.
- Click OK. A topic named “Web Cache” will appear in the Selector. It will contain the Web Page items pointing to pages that you have browsed previously.
- Click on one of the web addresses to return to a web site you visited previously.
- Choose Menu Ribbon | Home | Filter | View All Items to leave the search filter.
Note: The number of days items are retained in your web cache is set in your browser. Choose Menu Ribbon | Home | Options | Internet | Internet Options to access browser settings for some browsers. You may need to ask your network administrator to change those settings.
The Search Filter
The Search Filter
The Search Filter contains items found in a search. When the Search Filter is active the Filter ribbon button appears pushed ![]() . Additionally, the status bar displays FILT. You can freely enter and leave the filter.
. Additionally, the status bar displays FILT. You can freely enter and leave the filter.
[:] To view the contents of the search filter:
- Choose Menu Ribbon | Home | Filter | View Filtered Items.
[:] To leave the Filter and restore the Selector to the way it was before the search.
- Choose Menu Ribbon | Home | Filter | View All Items.
[:] To leave the Filter and stay positioned on a highlighted item:
- Choose Menu Ribbon | Home | Filter | View All at Current.
Viewing Topics in the Filter
If a Topic is in the Filter, it does not mean that its sub items will be in the Filter. For example, if you search for a Topic named “Things To Buy”, the “Things To Buy” Topic will be placed in the Filter but its sub items will not be placed in the filter unless they also contain the text “Things To Buy”. To view sub items, leave the Search Filter by choosing Menu Ribbon | Home | Filter | View All at Current.
Searching for items in the Filter
You can search for the information stored in the Filtered items only. For example, you can search for “John Smith” and then search the found items for the word “invoice” to located invoices from John Smith.
[:] To search within the Filtered items:
- Choose Home | Search.
- In the Search for box, enter the word, phrase or number you want to find.
- Check the Within Current Filter option.
- Click OK. The Search Filter will contain only the items found by the Search.
Moving Items To and From the Filter
You can move specific items to or from the Filter. For example, suppose you want to change all occurrences of the name “ABC Inc.” to “ABC Corp.”, except for one specific Note. First, perform a search for “ABC Inc.”. Then remove the specific Note from the Filter. Finally, issue the Replace command to change all items in the Filter to the new name.
[:] To place an item into the Filter when the filter is not active:
- From the Selector choose the item and press CTRL + RIGHT ARROW.
[:] To remove an item from the Filter when the filter is active:
- Choose the item from the Selector and press CTRL + LEFT ARROW.
Group operations for filtered items
You can group all items filtered by a search into one topic. For example, you may want to move all items containing “Network Connection” into a separate topic.
[:] To split filtered items into a separate Topic:
- Perform a search using the desired key.
- Choose a Topic containing matching items.
- Choose Menu Ribbon | Selector | Split and confirm.
Wild card searching
Wild card searching
A wild-card character is a special symbol that matches any other character during a search. You can search your Info Select data using wild-card characters. For example, a search for Rec??ve will match Receive (the correct spelling) and Recieve (the incorrect spelling).
[:] To search using wild cards:
- Choose Menu Ribbon | Home | Search.
- Enter a phrase placing “?” wherever you want to insert the wildcard character.
- Click OK.
Searching by item type
Searching by item type
You can specify the type of items Info Select should search. For example, if you know that the information is located somewhere in your Notes or E-mail Messages, you can check the Note and E-mail option to have Info Select search only in those data types.
To perform a search by type, in the Search dialog, under the Search for Types option check or uncheck the desired item types. Click + to expand the item type and view the sub-types. Uncheck the Search for Types option to have Info Select search in all item types. Double-click on any item to have all other items unchecked / checked. Look at the message below the Search Map to see which items are not searched.
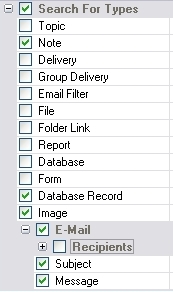
You can prevent Info Select from searching within certain data types by unchecking the corresponding options under the Search Inside tree. For example, you can bypass searching inDelivery items by unchecking the corresponding option, or bypass searching subtopics of the currently selected Topic by unchecking the Topic option. Click + to expand the item type and view the sub-types.

Uncheck the Search Inside option to have Info Select search in the currently selected topic only.
Here are some examples of using the Search for Types feature:
- To search for all Notes that contain the word “apple”, under the Search for Types tree double-click on the Note option to have it checked and type apple in the Search for box.
- To exclude items located in the Recycle Bin from search uncheck the Recycle Bin under the Search Inside tree.
Filtering items by Type
You can filter all items of a certain data type. For example you can filter all Files or all Grids.
[:] To filter items by data type:
- Choose Menu Ribbon | Home | Filter | By Type. A dialog box appears:
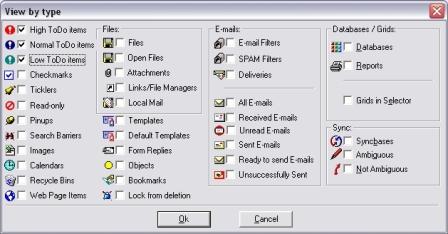
- Select the desired types of data and click OK. The items found by the search will be shown in the Selector and the Search Filter will be activated.
- After viewing the search results, choose Menu Ribbon | Home | Filter | View All Items (F4) to view your unfiltered data.
Search Troubleshooting
Search Troubleshooting
If you think that a Search has produced incorrect results, try these tips:
- In the Search dialog box check Text, Captions, Pass Barriers and All Topics options. Disable Case Sensitive, Whole Words and Within Current Filter option. Try the search again. After trying this turn off Pass Barriers.
- Use scrollbars to view hidden text or windows.
- Read any warnings above the Search for box in the Search dialog. For example it may warn that Info Select does not search though closed files (those grayed out in the Selector). If you think your data might be located in a closed file, open the File and try the search again.
- In some item types such as the Calendar you will need to use Menu Ribbon | Home | Find to locate matches within the item.
- You can use the Find command on the Windows Start menu to search your entire hard disk.