Options
Intro to Options
Intro to Options
You can customize Info Select in a variet of ways. This section explains how to use these options. The Options dialog is organized in outline format. Items in the outline can be expanded by clicking the + icon.
The following options are covered outside of this section: Outline, Stamping, Transporter, Quick Text, E-mail, Local Mail, Spelling, Calendar, Synchronization.
Default settings
Default settings
The following options are available when choosing Menu Ribbon | Home | Options | Defaults.

Restore Program Settings
Click this button to restore the program settings. You will be prompted to restore settings to factory defaults or from the backup copy of the InfoSelect.INI file. The backup is created automatically when you make changes in the Menu Ribbon | Home | Options dialogs.
Restore Default Dialogs State
Some dialogs include the “Don’t show me again” checkbox. Click this button to reset these dialogs so they appear when appropriate. Resetting is useful when a person using Info Select changes, when you disable such dialog by mistake, or if you want to be sure that you are receiving all warnings.
Restore Default Printer Settings
Click this button to reset printing settings to default. This may help if you are having problems with printing or configuring Print Layouts.
Default Templates
Default Templates
The following options are available when choosing Menu Ribbon | Home | Options | Default Template.

Set Default Template
Click this button to set a Default Template for the highlighted item. Click here for more information about the default appearance of new items.
Miscellaneous
Miscellaneous
The following options are available by choosing Menu Ribbon | Home | Options | Misc
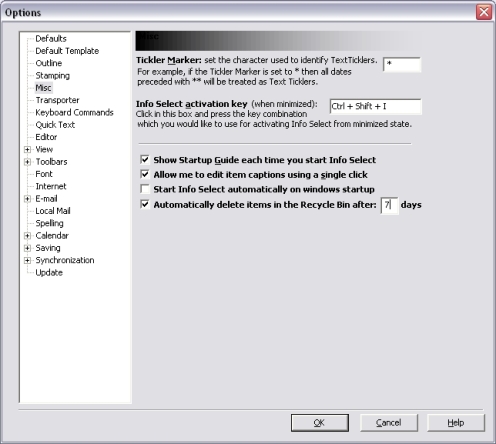
Tickler Marker
In the Tickler Marker box, set the character used to identify text ticklers. This feature is deprecated.
Info Select hot key
Allows to set a custom hot key to activate Info Select when the Info Select window is minimized, hidden behind other windows, or when the program is minimized in the system tray).
Show Startup Guide each time you start Info Select
This will display the Startup Guide when you start Info Select. The Startup Guide shows you basic functions of Info Select.
Allow me to edit captions using a single click
Check this option if you want to edit captions by single-clicking on them.
Start Info Select automatically on windows startup
Enable this option to have Info Select automatically loaded when your computer starts.
Automatically delete items in the Recycle Bin after N days
Check this option to have Info Select empty Recycle Bins automatically after the specified time interval.
Keyboard letter commands
Keyboard letter commands
The following options are available when choosing Home | Options | Keyboard Commands.
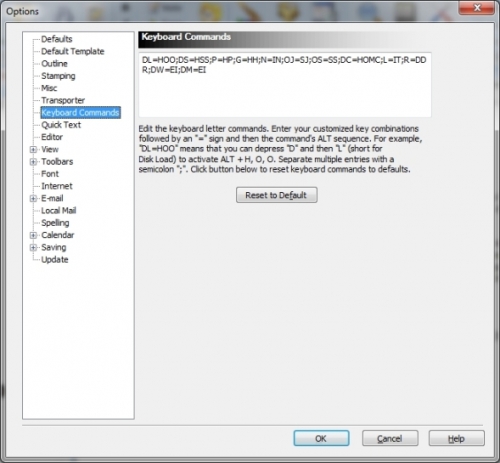
This feature allows you to use the keyboard to invoke commands. For example, you can make the single letter P issue the Print command instead of having to press CTRL + P. This feature also allows support of commands from earlier versions of Info Select and for any personal preferences you may have.
Note: Letter commands do not apply while editing text; and changes to the shortcuts are not reflected on the menus. To setup keyboard letter commands: Enter your customized key combinations followed by an “=” sign and then the command’s ALT sequence. For example, “DL=HOO” means that you can depress “D” and then “L” (short for Disk Load) to activate ALT + H, O, O (Home | Open | Open). Separate multiple entries with a semicolon “;”. You can disable all keyboard letter commands by deleting the codes in the Keyboard commands text box. Click Reset to Default button to reset the keyboard letter commands to default values.
The codes that are already included with Info Select are:
DL=HOO;DS=HSS;P=HP;G=HH;N=IN;OJ=SJ;OS=SS;DC=HOMC;L=IT;R=DDR;DW=EI;DM=EI
Editor options
Editor options
The following options are available when choosing Menu Ribbon | Home | Options | Editor.
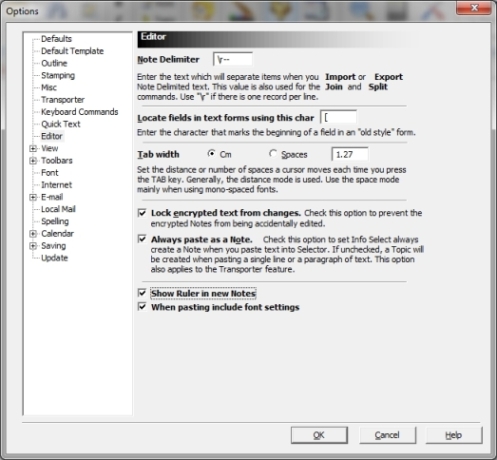
Note Delimiter
Enter the text that separates items from each other during a File import or export of Note delimited text. This value is also used for the Join and Split commands. Use “\r” if there is one record per line.
Locate fields in text forms using this char
Enter the character that marks the beginning of a field in an “old style” form. This feature is deprecated.
Tab Width – Inches (Centimeters) or Spaces
Set the distance or number of spaces a cursor moves each time you press the TAB key. Generally, the distance mode is used. Use the space mode mainly when using mono-spaced fonts.
Prevent changes to encrypted text
Check this option to prevent encrypted Notes from being accidentally edited.
Always paste as a Note
Check this option to set Info Select to always create a Note when you paste text into the Selector. If unchecked, a Topic will be created when pasting a single line or a paragraph of text. This option also applies to the Transporter feature.
View Options
View
The following options are available by choosing Menu Ribbon | Home | Options | View | General.
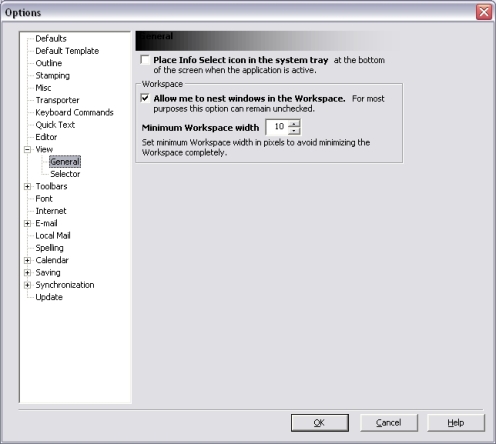
Place Info Select icon in the system tray
Check if you want the icon for Info Select to be shown in the system tray at the bottom of the screen when the application is active.
Allow me to nest windows in the Workspace
This feature allows you to nest windows inside one another in the Workspace. For most purposes this feature can remain unchecked.
Minimum Workspace width
This setting allows you to set the minimum Workspace width (in pixels) to ensure that the Workspace is not minimized completely.
The following options are available by choosing Menu Ribbon | Home | Options | View | Selector.
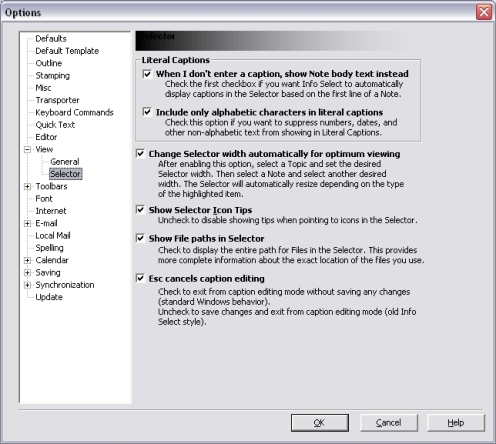
Literal captions
If you want Info Select to automatically display captions in the Selector based on the first line of a Note, check When I don’t enter a caption, show first line of Note option. If you want to create your own captions, uncheck this option. Literal captions appear in the Selector beginning with a quotation mark.
If you want to suppress numbers, dates, and other non-alphabetic text from showing in literal captions, check the Include only alphabetic characters in literal caption checkbox.
Change Selector width automatically for optimum viewing
Check to have the Selector automatically resize itself for optimal viewing. After enabling this option, select a Topic and set the desired Selector width. Then select a Note and select another desired width. The Selector will automatically resize depending on the type of the highlighted item. For example, when a Line Note is selected, Selector width will be maximized. When the highlighted item is a Delivery, Selector will be minimized to the size of the Delivery.
Show Selector Icon Tips
Uncheck to disable showing tips when pointing to icons in the Selector.
Show File paths in Selector
Check to display the entire path for Files in the Selector. This provides more complete information about the exact location of files you use.
Esc cancels caption editing
Check to exit from caption editing mode without saving any changes.
Font Options
Font
The following options are available by choosing Menu Ribbon | Home | Options | Font.
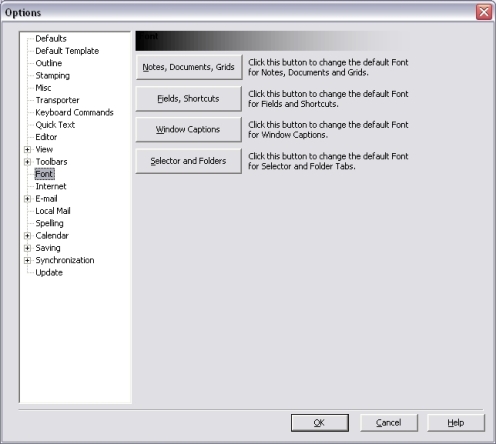
Setting the appropriate font and point size for your Selector, Notes, and Field names is important. The smallest comfortable point size will enable you to view the most data at one time. A point size between 6 and 12 is generally recommended. Non-bold fonts allow you to display more data than bold fonts. (If you need a bold font, it is recommended to choose a font that is inherently bold). To ensure that printouts are consistent with your screen display, select only True-Type fonts. The default fonts are:
Notes and Topics – Arial, size 10
Selector and Folders – Arial, size 9
Field Names and Contents – Arial, size 8
Window Captions – Arial, size 8
[:] To set default fonts:
Choose Menu Ribbon | Home | Options | Font.
Click one of the buttons and fill in the standard font dialog.
Note: Setting the default font for Notes will generally change the font of pre-existing Notes. If a Note’s font does not change, the font used in that Note was set manually. To change a Note so that it uses the default font: select the Note; choose Menu Ribbon | Note | Remove Formatting; check Point Size and Font Name; and click OK.
Internet Options
Internet
The following options are available by choosing Menu Ribbon | Home | Options | Internet.
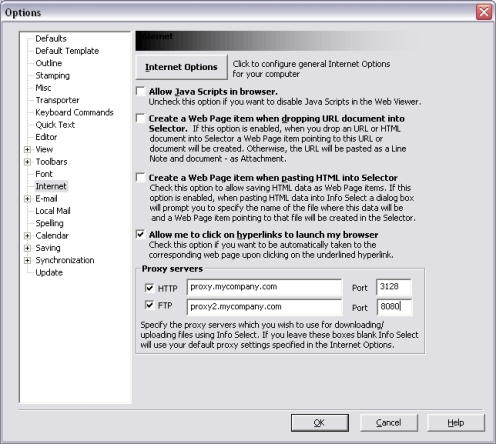
Click Internet Options to modify your System’s Internet Options. For example, you may want to change the default connection used to connect to the Internet, or select the S/MIME certificate for e-mail encryption.
Note: These settings are documented by Microsoft.
Allow JavaScript in browser
Uncheck this option to disable Java Scripts in Web Viewer and HTML e-mail messages. For example, this will avoid the annoying pop-up ad windows.
Create a Web Page item when dropping URL or HTML document into Selector
If this option is enabled, a Web Page item will be created when you drag and drop a URL or HTML document into the Selector pointing to that URL or document. Otherwise, the URL will be pasted as a Line Note and HTML document – as File Attachment.
Create a Web Page item when pasting HTML into Selector
Check this option to allow saving the HTML data, pasted into Selector, as Web Page items. When this option is enabled, each time you paste HTML data into Info Select a dialog box will prompt you to specify the name of the HTML file where this data will be stored, and a Web Page item pointing to this file will be created in the Selector.
Launch my browser when a hyperlink is clicked
This feature allows you to click any hyperlink (underlined text) to automatically take you to the corresponding web page. Hyperlinks will not be underlined if this option is unchecked.
Proxy Servers
Here you can specify the proxy servers which should be used when uploading/downloading files with Info Select. These settings apply to downloading the updates. You can choose different proxy servers for HTTP and FTP protocols. Leave these boxes blank to use the default proxy settings specified in the Internet Options.
Images Options
Internet Options
The following options are available by choosing Menu Ribbon | Home | Options | Internet.

Click Internet Options to modify your System’s Internet Options. For example, you may want to change the default connection used to connect to the Internet, or select the S/MIME certificate for e-mail encryption.
Note: These settings are documented by Microsoft.
Allow JavaScript in browser
Uncheck this option to disable Java Scripts in Web Viewer and HTML e-mail messages. For example, this will avoid the annoying pop-up ad windows.
Create a Web Page item when dropping URL or HTML document into Selector
If this option is enabled, a Web Page item will be created when you drag and drop a URL or HTML document into the Selector pointing to that URL or document. Otherwise, the URL will be pasted as a Line Note and HTML document – as File Attachment.
Create a Web Page item when pasting HTML into Selector
Check this option to allow saving the HTML data, pasted into Selector, as Web Page items. When this option is enabled, each time you paste HTML data into Info Select a dialog box will prompt you to specify the name of the HTML file where this data will be stored, and a Web Page item pointing to this file will be created in the Selector.
Launch my browser when a hyperlink is clicked
This feature allows you to click any hyperlink (underlined text) to automatically take you to the corresponding web page. Hyperlinks will not be underlined if this option is unchecked.
Proxy Servers
Here you can specify the proxy servers which should be used when uploading/downloading files with Info Select. These settings apply to downloading the updates. You can choose different proxy servers for HTTP and FTP protocols. Leave these boxes blank to use the default proxy settings specified in the Internet Options.
Saving Options
Saving
The following options are available by choosing Menu Ribbon | Options | Saving | General.
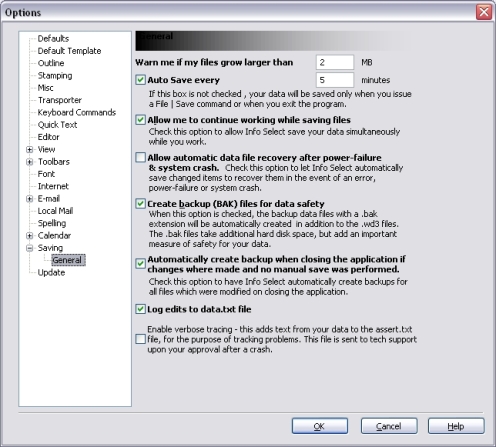
Warn me if files grow larger than – you will be warned when your files grow too large. Enter the desired maximum file size in units of 1024 Kb.
Auto Save Every (Minutes) – check this box to activate the Auto-Save feature. Enter the number of minutes between each Auto-Save. If this box is not checked and this feature is not active, a Save will only be performed when you issue a Menu Ribbon | Home | Save command or when you exit the program.
Allow me to continue working while saving files – the Auto-Save feature is important for protecting your data. However, it can cause a delay while you work. The Background Saving option allows Info Select to save your data simultaneously while you work. the Auto-Save feature is important for protecting your data. However, it can cause a delay while you work. The Background Saving option allows Info Select to save your data simultaneously while you work.
Allow automatic data file recovery after power-failure & system crash – check this option to let Info Select automatically save changed items and try to recover them in the event of an error, power-failure or system crash.
Create backup (BAK) files for data safety – when checked, data files will be automatically created with a .bak extension in addition to the .wd3 extension. The .bak files take additional hard disk space, but add an important measure of safety for your data. You can create backup files manually by highlighting a file in the Selector and choosing Menu Ribbon | Home | Backup…. If this option is enabled, a .bak file will be created also for the InfoSelect.INI file (which stores the program settings).
Create backup when closing the application if changes were made and no manual save was performed – check this option to have Info Select automatically create backups for all files which were modified on closing the application.
Update Options
Update
The following options are available when choosing Menu Ribbon | Home | Options | Update.
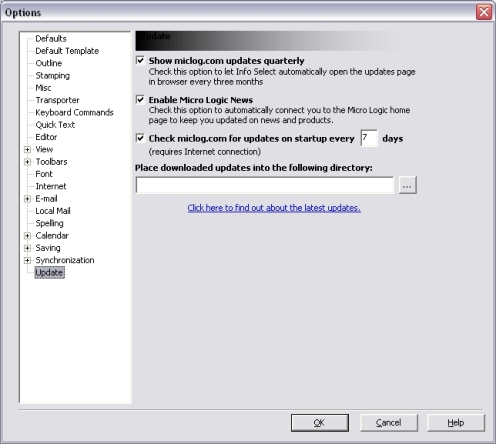
Show miclog.com updates quarterly
Check this option to let Info Select automatically show you the the web site updates page every three months.
Enable Micro Logic News
Check to automatically connect you to the Micro Logic home page to keep you updated on news and products.
Check miclog.com for updates on startup every N days
Enable this option to let Info Select automatically check the miclog.com site for program updates every N days. Info Select will prompt you to download and install the new program update if it is available. The downloaded file will be placed into the directory which you can specify in the Place downloaded updates into the following directory box (if you don’t specify the directory, you will be prompted to do so).
After downloading, Info Select will prompt you to Start installation after closing Info Select and to Close Info Select now. If you click OK with both options checked, next time you start Info Select the newly downloaded update will be installed, and then you may continue using the program.
Click on the hyperlink to view the Micro Logic web site at https://www.miclog.com.