Internet E-mail
Intro to Internet E-mail
Intro to Internet E-mail
Your Internet e-mail is often related to notes or other information stored in Info Select. You can compose, send, receive, search through and store your e-mail with related data in Info Select with dramatic benefits over using a separate e-mail application. For example, a search by a company name would turn up all your notes about that company and all your prior e-mails.
Info Select supports POP3 and IMAP e-mail.
Note to upgraders: Info Select relied on Windows Messaging as an e-mail engine in prior versions. This version supports e-mail directly. This makes installation much easier, improves reliability, and adds enhanced features. The powerful new e-mail feature will increase your productivity and enjoyment of Info Select. It is recommended to use Info Select for all your e-mail activities.
Tip: Click here to learn more about general e-mail concepts.
E-mail Setup
E-mail Setup
This section explains how to setup Info Select for email.
[:] To prepare to setup e-mail:
- Write down any settings in your prior e-mail program.
- Deactivate your old e-mail program. For example, if you used Window Messaging (used by earlier Info Select e-mail), right click on your desktop’s Inbox icon and choose Properties | Select Internet Mail | Remove.
- Check Menu Ribbon | Home | Options | E-Mail | General | Set Info Select as default application for sending email.
You can setup Info Select e-mail by importing settings from certain other e-mail applications.
[:] To import settings from another e-mail application:
- Choose Menu Ribbon | Home | Options | E- Mail | E-mail Accounts | Import Settings.
- Check the program from which you want to import settings.
- Click OK twice.
If you cannot import settings from another e-mail application, make settings manually.
[:] To manually setup Info Select e-mail:
- Choose Menu Ribbon | Home | Options | E- Mail | E-mail Accounts | Add…. A dialog box appears:
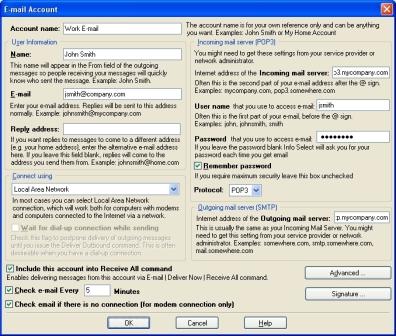
- Fill in the dialog by referring to the instructions in each section of the dialog. Click the Advanced… button if you need to setup additional options such as Secure Password Authentication (SPA) or if your server requires SSL connection. Click Signature… to specify the signature for sending outgoing e-mail messages from this account.
If you have trouble with any of these settings, consult your system administrator or Internet Service Provider. - Click OK twice.
Note: You can choose between POP3 and IMAP e-mail by selecting the necessary item in the drop-down box below the Password field.
Note: Enable Secure Password Authentication (SPA) if you are using MSN for e-mail.
You can review and change e-mail account settings at any time by choosing Menu Ribbon | Home | Options | E- Mail | E-mail Accounts; selecting an account; and clicking Properties.
If you only have one e-mail account make it your Default account. If you have more than one account, set as Default the account you want to use to send e-mail.
[:] To set your Default e-mail account:
- Choose Menu Ribbon | Home | Options | E- Mail | E-mail Accounts.
- Select the account you want use as the default.
- Click Set as Default.
- Click OK.
If you use a dial-up connection and want to avoid dialing each time you finish writing an e-mail message, check Menu Ribbon | Home | Options | E- Mail | E-mail Accounts | Properties | Wait for dialup connection when sending.
After setting up the E-mail Accounts, you can adjust the format in which the new e-mail messages will appear in Info Select.
[:] To set the format of the e-mail messages:
- Choose Menu Ribbon | Home | Options | E-mail | E-mail Format.
- Select which fields should appear in the New, Received and Sent e-mail messages (i.e. To, From, Subject, CC, BCC, Reply-To, Time, Sent). Uncheck Show externally referenced images for HTML e-mail to prevent displaying images, stored elsewhere in the Internet, in HTML e-mail messages. This help to prevent tracking your address by spammers. You can view these images, if necessary, by right-clicking in the e-mail message text and choosing Show externally referenced images… in the pop-up menu.
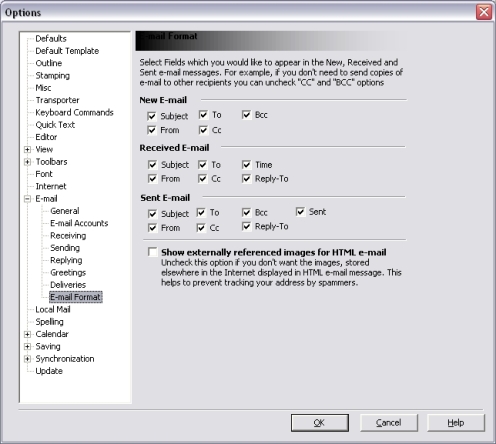
- Click OK.
You can protect sent and received e-mail messages from editing. For this purpose, uncheck the Menu Ribbon | Home | Options | E-mail | General | Allow to edit Sent and Received E-mails.
Address Book
Address Book
An Address Book is provided to store common e-mail addresses. Each address is stored in the Selector as a ![]() Delivery item.
Delivery item.
[:] To add a recipient to the Address Book:
- Choose Menu Ribbon | Insert | E-mail | Delivery. A new Delivery item will be created.
Alternatively, you can right-click on the e-mail address in a Note and choose Add to Address Book…. If this option is grayed out, then this e-mail address is already stored in the Address Book. - Fill in the Default e-mail address and the person’s name and title. Click Additional… to add more addresses for the recipient.
- Click Change… under the Encryption Options to set the encryption options for the recipient.
- Select the parameters for the new messages received from this person. Info Select can either:
Show Todo icon immediately, Wait N hours before showing Todo icon, Do Nothing – do not show the Todo icon at all, or Delete all new messages. - Increase the Priority setting only if you need to override an e-mail Filter.
- In the Confirm inbound confirmation requests drop down box select the reaction to e-mail messages requiring Delivery confirmation. Choose Ask Me to be prompted before sending the confirmation, or Always to automatically send confirmations. Choose Never if you don’t want to send delivery confirmations to the recipient.
- Select the e-mail account from which the e-mail messages will be sent to this address.
- Check Include in Address Book.
- If you want to send e-mail messages that confirm that the recipient receives your messages, check Confirm Delivery of outbound messages.
- If you want to remove close and opening lines in replies, check Remove opening and closing lines in reply.
- You can set the Delivery to automatically Join e-mails with the same information in To, CC, BCC fields into a single message. This prevents from storing duplicate messages in the Delivery.
- Check Process HTML messages as attachments to have HTML e-mail messages automatically converted into *.HTML file attachments for opening them in an external browser.
- Check Show e-mails as selector grid if you want messages from this person to be displayed as a Selector Grid. Click Selector Grid… to adjust Selector Grid properties.
- Check Send automatic acknowledgments on incoming e-mails to automatically send receipt confirmations to message senders.
- You can use the Notes field for phone numbers or any other information.
- Click Greetings… to setup personal greetings for the recipient.
- You can drag the Delivery to another Topic, such as My E-mail Contacts, if desired.
You can modify an Address Book entry. Choose Menu Ribbon | E-mail | Address Book…, select the necessary entry in the list and click Properties. The Delivery item corresponding to the selected entry will be highlighted in the Selector and you can modify it’s properties. To delete an Address Book entry, highlight it in the list and click Delete.
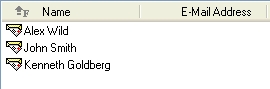
You can sort the Address Book by First and Last Name or by e-mail address.
[:] To Sort Address Book entries:
- Choose Menu Ribbon | E-mail | Address Book….
- Click on the Name or E-mail Address column header. A gray arrow will show the sort order. A gray letter “L” or “F” indicates sorting by Last or First name respectively.
- Click on the header repeatedly to change the sorting options.
You can search for specific Delivery or E-mail address.
[:] To search for a Delivery or E-mail address:
- Choose Menu Ribbon | E-mail | Find Delivery… or Menu Ribbon | E-mail | Address Book | Search for…. A dialog box appears.
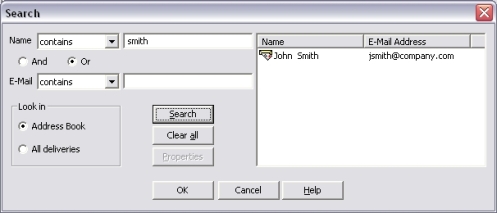
- Choose Contains or Doesn’t Contain from the dropdown list.
- Enter the Name of the person to find.
- Choose And or Or and fill the E-mail box to search for an e-mail address.
- Choose All Deliveries to look in all deliveries in your Info Select database. Otherwise, choose Address Book.
- Click Search. The found items will be displayed in a list.
For example, if you type “Smith” into Name and “smith” into E-mail, choose Or and All deliveries, Info Select will search for all deliveries which contain “Smith” in the First or Last name fields, or which contain the word “smith” in the E-mail field.
To access the properties of the found Delivery, select the Delivery in the list on your right and click Properties.
Click Clear all to clear all the search options.
Sending data by E-mail
Sending data by E-mail
You can send a file with your e-mail. For example, you might need to send to an investor a spreadsheet file showing a sales projection. Such files are called attachments. Info Select is able to send and receive Rich Text Format (.rtf), UUENCODE and BINHEX e-mail attachments.
[:] To add a file attachment to a message:
-
Place the cursor in the e-mail message field.
-
Choose Menu Ribbon | E-Mail Message | Insert Attachment. A dialog box appears.
-
Select the file you want to attach and click Insert. An icon for the attached file will appear in the E-mail message field.
You can include up to 99 attachments in a message.
You can save e-mail attachments to disk or a remote site.
[:] To save an e-mail attachment:
-
Right-click on the attachment icon and choose Save As…. A dialog box appears.
-
Select the necessary directory and click OK.
Tip: You can append the name of the attached file to e-mail message in order to make sure that the recipient will not miss the attachment. For this purpose you can enable the Menu Ribbon | Home | Options | E-mail | Sending | Include attachment file name also as text option.
You can also set Info Select to replace the attached files in sent e-mail messages with the attached file names. For this purpose you need to enable the Menu Ribbon | Home | Options | E-mail | Sending | Prompt to replace the attachments with their file names after sending option.
You can send any Info Select data (notes, topics, calendars, databases, etc.) via e-mail to another Info Select user.
[:] To send Info Select data via e-mail:
-
Create a new e-mail message.
-
Drag any Info Select data into the message in the Selector. You can expand the email topic to see the subordinate (indented) data.
- Send the e-mail message.
or…
-
Drag the item onto the Delivery of the other Info Select user. You must enable Menu Ribbon | Home | Options | E-mail | Deliveries | Send items dropped into Delivery.
Note: You can select the file format in which the Info Select data should be sent. For example, you may want to send some data to an Info Select 2007 user. For this purpose choose the necessary version in the Menu Ribbon | Home | Options | Sending | Send data in Info Select version N format drop down box.
Note: If the recipient doesn’t have Info Select, then he will receive any data sent using the method above as a “Info Select Data.wd3” file attachment. Therefore, you need to include this data into your message body. For example, to send an image stored in the Selector, you need to copy it and paste into message body.
[:] To send a single item:
-
Highlight the item to send.
-
Choose Menu Ribbon | E-mail | Send. The Address Book dialog box appears.
If the recipient’s address is listed, double-click it and click OK. Or enter the address into the box under the recipients list and click To-> button, then click OK. -
Choose Menu Ribbon | E-mail | Send.
You can paste images into your e-mail. For example, you might want to show a new logo to a client.
[:] To place graphics in an e-mail:
-
Copy the image to the clipboard.
-
Place the mouse cursor in the e-mail Message field.
- Choose Menu Ribbon | Home | Paste and choose Yes when Info Select prompts you to insert file as a File Attachment. The recipient will receive the e-mail message with the image attached.
Tip: To use an image as the background for your e-mail message, consider creating the message in HTML format.
Advanced Options
Advanced Options
You can configure several options for sending, receiving and replying to e-mail.
[:] To configure Sending, Receiving and Replying options:
- Choose Menu Ribbon | Home | Options | E-Mail | Sending.
- Fill in the dialog by referring to the instructions provided in the dialog.
- Click OK.
Do the same for the Receiving and Replying options.
You may not want to include the attachments contained in received e-mail messages into your replies.
[:] To disable including attachments into replies:
- Choose Menu Ribbon | Home | Options | E-mail | Replying.
- Select whether you would like to include the attachment into Original & Reply , Reply Only or Original Only messages.
- Click OK.
To include the date and time of the original e-mail message receipt into your reply enable Menu Ribbon | Home | Options | E-mail | Replying | Insert the date the original message was received into reply.
You can arrange for an automatic log of emails. With Menu Ribbon | Home | Options | E-mail | Receiving | Log received e-mail location in the Outline enabled, a Note labeled “Received E-mail Log” will be created in the Selector. This Note will contain the log of received e-mail messages, including the sender, subject, received date and time and the location in the Outline where the message has been placed.
You can determine how to handle emails requesting Delivery Confirmation. For example, you can enable a warning before sending delivery confirmations to choose whether to send the confirmation or not.
[:] To set the delivery confirmation method:
- Choose Menu Ribbon | Home | Options | E-mail | Receiving.
- Under Send delivery confirmation choose the desired option. Choose Ask Me if you want to be prompted before sending the confirmation, or Always to automatically send confirmations to all e-mail messages which require confirmations. Choose Never if you don’t want to send delivery confirmations.
- Click OK.
You can enable or disable the CTRL+ENTER shortcut used for sending e-mail.
[:] To enable (disable) the CTRL+ENTER shortcut:
- Check (uncheck) Menu Ribbon | Home | Options | E-mail | General | Enable sending an e-mail message by Ctrl+Enter
If your mail server communicates on a different port from the default, or if you lose connection with your mail server often, you can customize which port to connect to for sending/receiving e-mail, and how long to wait for a response if a connection is lost.
[:] To change the default port or delay timeout for your mail server:
- Choose Menu Ribbon | Home | Options | E-Mail | E-mail Accounts.
- Select the account you want to configure.
- Click Properties… | Advanced….
- In the appropriate fields, enter port numbers for your Incoming and Outgoing mail servers, or click Set default to restore the default values (default port numbers should work for most servers – don’t change them unless you are certain).
- To increase or decrease the amount of time Info Select will wait for a connection to resume after it is lost, drag the Timeout slider.
- Click OK three times.
When using a dial-up connection to send or receive e-mail messages, the connection might break. You can set Info Select to automatically re-try sending or receiving e-mail message in case when the connection is broken.
[:] To enable re-trying receiving e-mail messages:
- Check Menu Ribbon | Home | Options | E-mail | Receiving | Automatically re-try receiving e-mail when the connection is broken.
[:] To enable re-trying sending e-mail messages:
- Check Menu Ribbon | Home | Tools | Options | E-mail | Sending | Automatically re-try sending e-mail when the connection is broken.
[:] To change the e-mail notification sound:
- Choose Start | Settings | Control Panel | Sounds.
- Find and select the New Mail Notification item.
- Change the sound by selecting from the drop-down list
- Click OK.
You can preview titles of e-mail messages before receiving them. Additionally, you can specify the size of e-mails which should be previewed and choose to preview titles either as a list, or each title at a time. For example, you can set Info Select to display titles of incoming messages which are larger than 1000 KB to avoid downloading large junk messages.
[:] To enable previewing titles of e-mail messages before downloading:
- Choose Menu Ribbon | Home | Options | E-mail | Receiving.
- In the Review e-mails before downloading box choose the way you would like to review the messages.
- Specify whether you should enable reviewing For all e-mails or For e-mails exceeding X KB.
- Click OK.
Encryption and Decryption
Encryption and Decryption
You can automatically encrypt and decrypt e-mail to a selected recipient. Encrypting will protect your information from access by others as it traverses the internet. Info Select allows two encryption methods: PGP or Info Select encryption. You can obtain PGP at http://www.pgpi.com.
[:] To encrypt messages to a recipient automatically:
- In the Selector, choose the Delivery for the recipient.
Under the Encryption Options click Change…. A dialog box appears: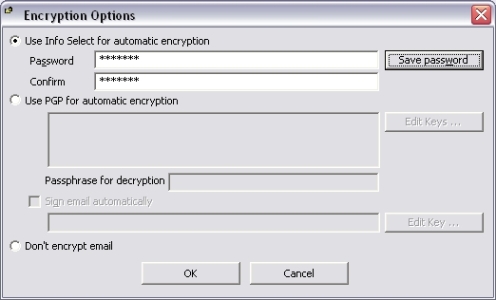
- Choose which encryption method to use: Info Select or PGP by checking the appropriate option.For the automatic Info Select encryption method, enter a password in both Password and Confirm boxes and click Save password.For automatic PGP encryption, use the Edit Keys… box to add the public keys of the recipient(s). Enter your decryption passphrase into the Passphrase for decryption box. Check Sign e-mail automatically and click Edit Key… to add the necessary key if you wish to sign your e-mail messages using PGP. Any file attachments will be also encrypted.
- Choose Don’t encrypt e-mail if you wish to disable the automatic encryption.
- Click OK.
Note: If PGP is not installed on your system the Use PGP for automatic encryption option will be grayed out.
When you send messages to the recipient the message will show a lock ![]() icon confirming encryption. In Info Select, the recipient will issue the Menu Ribbon | Home | Decrypt command or, to decrypt automatically, place the same password in the Delivery allocated for your messages.
icon confirming encryption. In Info Select, the recipient will issue the Menu Ribbon | Home | Decrypt command or, to decrypt automatically, place the same password in the Delivery allocated for your messages.
Encrypting and Decrypting Attachments
You can encrypt an attachment using PGP.
[:] To encrypt an attachment:
- Make sure that PGP is installed on your system.
- Choose Menu Ribbon | Home | Encrypt and select use PGP and click OK. A PGP dialog appears.
- Select the necessary recipients (see PGP documentation) and click OK.
You can decrypt PGP-encrypted attachments directly from Info Select: Such attachments have a .PGP extension (for example, “document.doc.pgp”).
[:] To decrypt an attachment:
- Select the PGP-encrypted attachment and choose Menu Ribbon | Home | Decrypt . A PGP dialog appears.
- Enter your PGP passphrase and click OK.
Form Replies
Form Replies
You can setup form replies for common e-mail messages. For example, suppose you have a link on your web site that allows visitors to request information on your product. Upon receiving a request you could invoke a form reply indicating their request has been received and is being processed.
[:] To create a form reply to e-mail messages:
- Choose Menu Ribbon | E-Mail | Form Reply | Insert Form Reply Note. A Form Reply icon
 will appear near the Note’s caption.
 - Enter a caption.
- In the body of the Note, create your letter. If desired, use @First and @Last for the recipient’s first and last name in your letter (works for messages that have properly formatted names in the From field). You can use @Message to show where you want the original message to appear.
Tip: You can change any existing Note into a Form Reply by choosing Menu Ribbon | Edit | Change Into | Form Reply.
Once you have created your master reply you can use it when you receive a new message for which the reply is appropriate.
[:] To use a standard reply for an e-mail message:
- Select the incoming e-mail message.
- Choose Menu Ribbon | E-mail | Form Reply and select the appropriate form reply.
- Choose Menu Ribbon | E-mail | Send.
Advanced E-mail
Advanced E-mail
You can have some greeting text automatically added to your outgoing messages:
[:] To add Greeting text:
- Choose Menu Ribbon | Home | Options | E- Mail | Greetings.
- Follow the instructions provided in the Greetings dialog box to create your signature.
- Check Apply greeting and ending text to new messages that are created outside of deliveries to have your greeting text added also to new e-mail messages which are created outside the Delivery items.
You can add a signature for your e-mail messages. Such signatures can differ for different e-mail accounts. For example, when you have separate accounts for Home and Office e-mail addresses, you can set different signatures for these addresses.
[:] To create an e-mail signature:
- Choose Menu Ribbon | Home | Options | E-mail | Accounts.
- Double-click on the desired e-mail account in the accounts list.
- Click Signature… and specify text to insert before and after the message text.
- Click OK twice.
You can send e-mail to multiple recipients. For example, you might send e-mails to all project engineers when scheduling a meeting.
[:] To send an e-mail to several recipients:
- Place multiple e-mail recipients in the To field. You can use Menu Ribbon | E-mail | Address Book… if it contains the recipients, or you can type the e-mail addresses separated by semicolons.
You can send an e-mail reply to everyone that received an original e-mail message – all the addresses in the To field. For example, if you receive an e-mail requesting your presence at a meeting and the message was also sent to several co-workers, you could reply to all parties with a message that the Director will be out of town.
Tip: Use Group Deliveries for sending e-mail to groups of recipients.
[:] To send a reply to all recipients of an e-mail message:
- Choose Menu Ribbon | E-mail | Reply All.
- Type in your response to the e-mail message.
- Send the message.
You can read your e-mail at home and get the same messages at work by enabling the “Leave copy of incoming messages on server” option.
[:] To leave incoming messages on the server:
- Check Menu Ribbon | Home | Options | E-mail | E-mail Accounts | Properties | Advanced | Leave copy of incoming messages on server. If necessary, you can set Info Select to remove the messages from server after the specified number of days by checking the Remove from server after N days option and specifying the number of days. You can also keep only a specified amount of messages on server by checking the Keep only N latest incoming e-mails from this account and specifying the number of e-mails to keep.
You can set Info Select to automatically move the e-mail messages into the Delivery item corresponding to the person to whom you are sending the message.
[:] To automatically move sent e-mail messages to corresponding delivery:
- Check Menu Ribbon | Home | Options | E-mail | Deliveries | Move sent messages to corresponding delivery. Note, that the relevant Delivery should exist.
Since all data, including e-mail, is loaded into memory, you may want to archive old e-mail to a disk file.
[:] To archive old e-mail:
- Choose Menu Ribbon | Edit | File | Data….
- Enter a File name such as c:\data\e-mail-thru-12/31/08.wd2 and click Save.
- Drag old messages into the new File or collapse the InBox and drag the entire InBox into the File.
- Select the File and choose Menu Ribbon | Home | Open | Close.
HTML E-mail
HTML E-mail
You can send and receive e-mail messages in HTML format. Such messages retain text formatting and font settings (such as font style and color, bullets, CSS styles), can contain images, tables, etc. Info Select also allows searching and editing HTML messages.
HTML e-mail messages have a different Selector icon – ![]() . Any attachments will be converted into File Attachments, and can be accessed by expanding the e-mail message.
. Any attachments will be converted into File Attachments, and can be accessed by expanding the e-mail message.
Tip: To change the encoding of HTML messages, right-click in the message body, choose Encoding, and select the necessary encoding from the pop-up menu.
Tip: To save an image in an HTML message to disk, right-click on it and choose Save Image As…. Then select the location to store the image.
You can compose and send outgoing e-mail messages in HTML format. Such messages will retain text formatting, font style and color, and images.
[:] To compose and send an e-mail message in HTML format:
- Choose Menu Ribbon | Edit | E-mail (or press F12). If you are located outside a Delivery, the Address Book dialog box appears (otherwise the To field of the new e-mail will already contain the address stored in the Delivery and you can continue to step 3).
- If the recipient’s address is listed, double-click it and click OK. Or enter the address into the box under the recipients list and click the To-> button.
- In the Subject field, enter a brief summary of your message. In the CC or BCC fields, enter the e-mail addresses of any additional recipients, separated by semicolons. CCrecipients will be able to see the addresses of other recipients. BCC (blind carbon copy) recipients will not be seen by the other recipients (if your service provider supports BCC).Tip: You can right-click on the underlined To, Cc and Bcc fields to choose the additional recipients from the pop-up list, or click on the underlined To, Cc and Bcc labels to display the Address Book and choose the recipients, if necessary.
- Choose Menu Ribbon | E-mail | HTML to convert the message into HTML format. The Selector icon for the e-mail message will change to
 .
. - Type the text of e-mail in the Message field. Use the E-Mail Message ribbon buttons to format the text of the e-mail, if necessary. To insert an Attachment, choose Menu Ribbon | E-Mail Message | Insert Attachment and select the necessary file.
- Choose Menu Ribbon | E-Mail Message | Send. The e-mail icon will change to
 to indicate the mail is being sent.
Note: You can set Info Select to always create new messages in the HTML format by choosing Menu Ribbon | Home | Options | E-mail | General | Compose new message as | HTML.
Note: When forwarding an HTML e-mail message, the forwarded message will be also created in the HTML format regardless of the Compose new message as setting. Replies to HTML messages will be created as Plain Text messages unless the Menu Ribbon | Home | Options | E-mail | Replying | Convert HTML e-mail into Plain Text format when replying option is unchecked.
You can insert images into HTML e-mail messages, for example to create messages with a company logo.
[:] To insert an image into an HTML e-mail message:
- Select the HTML e-mail message and click in the e-mail text to edit it.
- Place the cursor to the position where you would like to insert an image and choose Menu Ribbon | E-Mail Message | Insert Image | From File…. A dialog box appears.
- Select an image on disk and click Open.
Note: Your recipient’s e-mail client must be capable of receiving HTML messages.
Note: You can convert an HTML e-mail message into Plain Text message by selecting the message and choosing Menu Ribbon | E-mail | Plain Text.
Deliveries
Deliveries
This section explains more about the Delivery data type. Deliveries are like Topics that hold the e-mails you get from a person. Deliveries are created automatically when you get e-mail from a new person. You can also create deliveries yourself by choosing Menu Ribbon | Insert | E-mail | Delivery.
Deliveries show several fields in the Workspace:
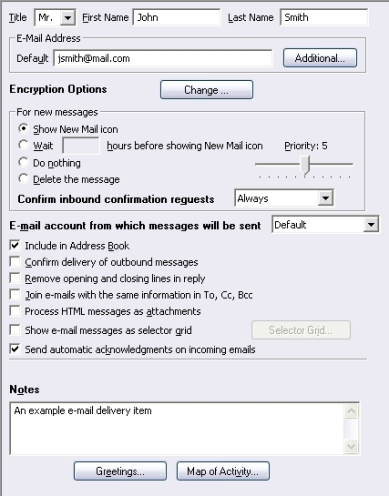
Title – enter the salutation for the person.
First and Last Name – enter the person’s name.
E-mail Address
Default – enter the default e-mail address for the person.
Click Additional… to add more addresses for the recipient or associate several people with the Delivery.
Encryption Options
Click Change… to set the encryption options for the recipient.
For new messages
Show Todo icon – check if you want to be informed when you get new e-mail for this person.
Wait N hours before showing Todo icon – check this option if you want the new mail iconto be displayed after the specified number of hours.Do Nothing – do not show the new mail icon for new messages. For example, you might want to ignore e-mail from a company that put you on an e-mail list that does not interest you. New messages will be accumulated in the Delivery but you will not be alerted to or distracted by such messages.
Delete the message – check to delete the new messages upon receipt. For example, you might want to automatically delete new messages from a spammer.
Priority – Use the priority setting to give preference to one Delivery over another when it is ambiguous which Delivery should receive a certain kind of message. 10 is the highest priority.
In the Confirm inbound confirmation requests drop down box select the reaction to e-mail messages which require Delivery confirmation. Choose Ask Me if you want to be prompted before sending the confirmation, or Always to automatically send confirmations. Choose Never if you don’t want to send delivery confirmations to this recipient.
Select the E-mail account from which the e-mail messages will be sent to this address
Include in Address Book – check this if you want the person to show in the e-mail address book.
Confirm delivery of outbound messages – check this is you want to be sure that the person gets your messages. For each message you send you will receive a confirmation of delivery by e-mail.
Remove opening and closing lines in reply – check this option to set Info Select to automatically remove opening and closing lines in the Reply to e-mail message stored in this Delivery. The first lines of an e-mail message before the first empty line are considered as Opening Lines. All lines after the last empty line in the message are considered as Closing Lines. For example, if the message looks like
Hello John!
Regarding your last inquiry…
Regards, Chuck.
Info Select will remove the lines “Hello John!” and “Regards, Chuck”.
Join e-mails with the same information in To, CC, BCC – check this option to have all messages with the same information in the To, CC and BCC fields joined into a single message. This will simplify replying to multiple messages from one person.
Process HTML messages as attachments – check this option to have the contents of incoming HTML e-mail messages presented as an *.HTML file attachment.
Show e-mails as selector grid – check if you want messages in this Delivery to be displayed as Selector Grid. Click Selector Grid… to adjust Selector Grid properties, if necessary.
Show e-mails as selector grid – check if you want messages in this Delivery to be displayed as Selector Grid. Click Selector Grid… to adjust Selector Grid properties, if necessary.
Check Send automatic acknowledgments on incoming e-mails in order to automatically send receipt confirmations to message senders.
Notes – you can store any text here such as a persons phone number.
Click Greetings… to setup personal greetings for this delivery. The greeting text will be added to all new messages created inside this delivery.
Click Map of Activity… to display a graphical summary of e-mail activity in the Delivery. You can review the amount of Received and Sent messages.
You can add more e-mail addresses to a Delivery. For example, you can enter the person’s home and work e-mail addresses.
[:] To add an e-mail address to a Delivery:
- Choose a Delivery in the Selector and click Additional. A dialog box appears.
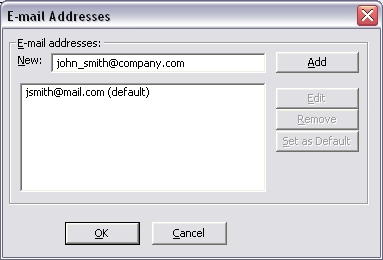
- Type in the new e-mail address and click Add. To edit an existing address, highlight it in the list and click Edit. Click Remove to remove the address from the list.
- Choose the address which you want to be a default e-mail address for the selected Delivery and click Set as Default.
You can configure the Delivery options in the Menu Ribbon | Home | Options | E-mail | Deliveries dialog:
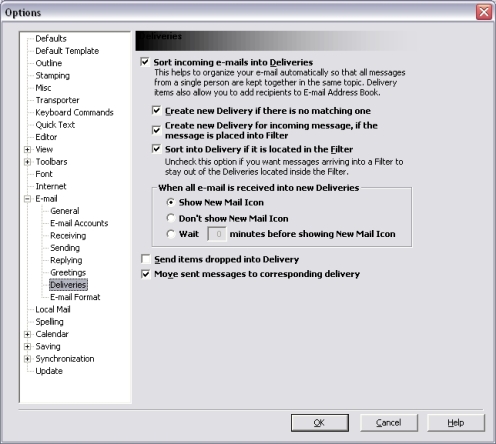
To have your e-mail messages automatically placed into Deliveries, enable the Sort incoming e-mails into Deliveries and Create new Delivery if there is no matching one options. Uncheck the last option if you would like to keep a fixed set of Deliveries and place all other messages into the InBox.
To create Deliveries when the message is placed into E-mail Filter enable the Create new Delivery for incoming message, if the message is placed into Filter.
You can also disable sorting messages into Deliveries if the Delivery is placed into the Filter by unchecking the Sort into Delivery if it is located in the Filter option.
You can configure how the New Mail Icon ![]() will be displayed for new messages, sorted into Deliveries, by choosing Show New Mail Icon, Don’t show New Mail Icon or Wait N minutes before showing New Mail Icon options.
will be displayed for new messages, sorted into Deliveries, by choosing Show New Mail Icon, Don’t show New Mail Icon or Wait N minutes before showing New Mail Icon options.
Enable the Send items dropped into Delivery if you wish to automatically create a new e-mail message for sending items dropped into Delivery via drag-and-drop operation. The dropped item will be attached to a new e-mail message addressed to the Delivery recipient.
You can set Info Select to automatically move the e-mail messages into Delivery item, corresponding to the person to whom you are sending the message by enabling the Move sent messages to corresponding delivery option. Note, that the Delivery for this person should exist.
Note: If the Delivery contains several messages received on the same date, the Subject of the first message will be shown before the Delivery’s caption. This helps to delete spam e-mail without expanding Deliveries. For example, you can delete messages with subject “Get Rich Quick”.
Note: It is recommended to have your e-mail sorted into Deliveries as it makes handling of e-mail messages more convenient and saves time.
Filters
Filters
Email Filters are like Topics that sort e-mails for you.
You can create Filters by choosing Menu Ribbon | Insert | Filter.
You can use Filters to setup automatic replies to certain messages. For example, you might want to send a “Thank You” note to customers requesting a brochure.
[:] To automatically reply to e-mail messages:
- Choose Menu Ribbon | Insert | Filter. An item with the
 icon will appear in the Selector.
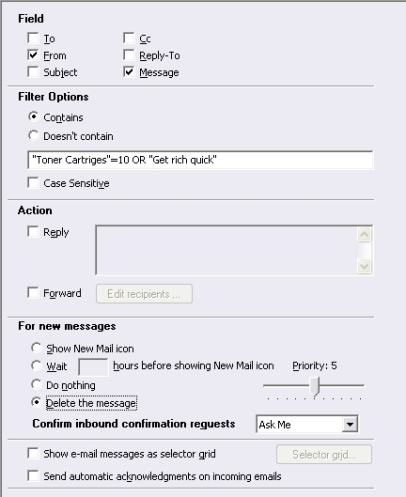
- Select the fields you want to use as conditions that messages be delivered into the Filter by checking the boxes at the top of the dialog box.
- Choose Contains or Doesn’t Contain under Filter Options.
- Enter the filter criteria into the box. You can use the Boolean expressions to add multiple filter conditions:Example: Toner AND “Get Rich” AND Medication. This will filter all the messages that contain words Toner, Get Rich and Medication.Also, e-mail Filters can filter e-mail messages where a specific word or phrase repeats more than specified number of times.Example: “Toner Cartridges”=3. This will filter all the messages where the phrase “Toner Cartridges” repeats more than three times.
- Choose Case Sensitive if you want to specify that the phrases case must match.
- Under Action choose Reply and set the reply text in the text area. Your message will be automatically sent to e-mail that goes into the Filter per the conditions you selected.Choose Forward and select a list of the recipients from the Address Book to automatically forward e-mail messages which are sorted into the Filter. Click Edit recipients… to modify the recipients list.Do not check any option if you want this filter to accumulate or delete incoming messages without any action.
- Under the For new messages section set the options which will be applied to new messages placed in the Filter. Choose Show Todo icon if you want to be informed when new e-mail messages are placed into the Filter.
Choose Wait N hours before showing Todo icon if you want the new mail icon to be displayed after the specified number of hours. For example, you may want to avoid constant interruption by SPAM or a particular person who sends too many messages.
Choose Do Nothing if you don’t want the Filter to show the new mail icon for new messages. For example, you might want to ignore e-mail from a company that put you on an e-mail list that does not interest you. New messages will be accumulated in the Filter but you will not be alerted to or distracted by such messages.
Choose Delete the message if you wish to delete the new messages upon placing them into Filter. For example, you might want to ignore messages containing “Get rich quick”.
[:] To create a SPAM filter:
- Choose Menu Ribbon | Insert | Filter.
- Make the desired settings in the top portion of the Filter.
- Uncheck Reply, Forward options and choose Delete the message. Any new messages that match the Filter criteria will be deleted. You will not be alerted to or distracted by such messages.
Use the Priority setting of a Filter to give preference to one Filter over another when it is ambiguous which Filter should receive a certain kind of message. 10 is the highest priority.
In the Confirm inbound confirmation requests drop down box select the reaction to the e-mail messages requiring Delivery confirmation. Choose Ask Me if you want to be prompted before sending the confirmation, or Always to automatically send confirmations. Choose Never if you don’t want to send delivery confirmations to this recipient.
Check the Show e-mails as selector grid option if you want messages in this Filter to be displayed as a Selector Grid. Click the Selector Grid… button to adjust the Selector Grid properties, if necessary.
Check Send automatic acknowledgments on incoming e-mails in order to automatically send receipt confirmations to message senders.
Group Deliveries
Group Deliveries
A Group Delivery is an item which stores a list of recipients for e-mailing to multiple recipients. You can use Group Deliveries to send e-mails to groups of people. For example, you might want to announce a new product to your customers or update a committee of co-workers.
[:] To create a Group Delivery:
- Choose Menu Ribbon | Insert | Group Delivery. A new item with the
 icon appears in the Selector.
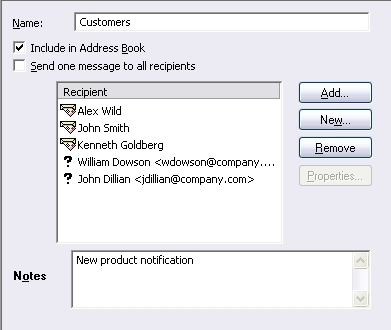
 - Type in the caption and press ENTER. The caption will be used as a Name of the Group Delivery (for example: “Employees”, “Friends”, “Customers”, etc.).
Uncheck Include in Address Book if you don’t want this Group Delivery to appear in the Info Select address book.
Check Send one message to all recipients if you would like to send a single message to all addresses listed in the Group Delivery rather than sending a separate message to each address.
Note: You can create as many Group Deliveries as necessary. The same recipients can be included into multiple groups.
After creating a Group Delivery add recipients.
[:] To add recipients to a Group Delivery:
- Choose a Group Delivery in the Selector.
- Click Add… An Address Book window appears. Select the recipient’s name in the list and click To button to add the recipient, or enter the address into the box under the recipients list and click To-> button.
- Click OK to finish adding recipients. A list of the added recipients appears in the Recipient list in the Group Delivery.
[:] To add new recipients to a Group Delivery:
- Choose a Group Delivery in the Selector.
- Click New. A dialog box appears.
- Type in the recipient’s Name and Address and click OK.
[:] To remove a recipient from a Group Delivery:
- Choose a Group Delivery.
- Select a recipient in the list and click Remove.
You can modify a recipient in a Group Delivery. For example, you might want to change an e-mail address.
[:] To modify a recipient in a Group Delivery:
- Choose a Group Delivery.
- Select a recipient in the list and click Properties…. Info Select will automatically take you to the Delivery of the selected recipient, or display properties of the recipient.
After creating a Group Delivery you can compose and send messages to the group.
[:] To send a group mailing:
- Choose Menu Ribbon | Insert | E-mail message. The Address Book window appears.
- Double-click the desired Group Delivery in the list and choose OK. Or expand the Group Delivery item in the Selector and press F12.
- A new e-mail message will be created. Instead of the To field, the e-mail message will contain a Topic labeled “To”, which holds the e-mail addresses listed in the Group Delivery.
- Fill in the Subject and Message fields.
- Choose Menu Ribbon | E-mail | Send. You will see the progress as the email is sent. You can stop in the middle by choosing Menu Ribbon | E-mail | Abort. Restart by choosing Menu Ribbon | E-mail | Send. You can examine the progress by expanding the e-mail message and viewing the To and Done Topics. A special Topic called Error will display any problem addresses. You can remove the problem addresses from Group Delivery by right-clicking on it and choosing Remove Undeliverable Recipients from the pop-up menu.
Notes
Check current laws before sending unsolicited mail. And check with your service provider about allowable limits for email.
The Menu Ribbon | Home | Options | E-mail | Deliveries | Send items dropped into Delivery option is disabled for Group Deliveries.
Tip: You can create Templates for your large e-mailings to save time.
Troubleshooting E-mail
Troubleshooting E-mail
If e-mail is not working properly, consider the following remedies:
- Make sure you have followed the setup steps.
- Close Info Select and restart it.
- Close Windows and restart it.
- If an e-mail address is underlined, try erasing it and typing the address directly into the “To” field.
- If you encounter difficulties after installing another application, it may be because Info Select uses a newer version of a DLL with an older version. Reinstalling Info Select may correct this. Backup you data before reinstalling any program.
- If new e-mail does not appear in the desired layout or is expanded, choose an e-mail message; choose Menu Ribbon | Home | Options | Default Template and click the button twice.
- Don’t try to connect two mail programs (e.g. Info Select and Eudora) to the mail server simultaneously – POP3 permits only one session at one time.
- Remove your old e-mail program before using Info Select for e-mail.
- If you keep getting a dialog to enter user name and password it may be because MSN uses Microsoft’s Secure Password Authentication (SPA) version of POP3. Check Menu Ribbon | Home | Options | E-Mail | E-mail Accounts | Properties | Advanced | Use Secure Password Authentication (SPA).
- If you keep getting a dialog “Can’t connect to incoming server”, make sure to choose the correct e-mail server type in the Menu Ribbon | Home | Options | E-Mail | E-mail Accounts | Properties dialog – POP3 or IMAP. Also, your server may require a SSL connection – consider enabling the Menu Ribbon | Home | Options | E-mail | E-mail Accounts | Properties | Advanced | This server requires a secure connection (SSL) option.
- If you keep getting a dialog “Can’t connect to outgoing server”, it may be because your ISP requires a “POP3 before SMTP” authentication. Enable the Menu Ribbon | Home | Options | E-Mail | E-mail Accounts | Properties | Advanced | Use “POP3 before SMTP” authenticaton option.
- AOL uses a proprietary e-mail method that is not compatible with most e-mail software, including Info Select. To use Info Select e-mail we recommend that you get a real e-mail account (one that supports the standard POP3 method) and continue to use AOL for its many non-e-mail functions. Free e-mail accounts are available from http://directory.google.com/Top/Computers/Internet/E-mail/Free/POP3. You can enable automatic forwarding from your AOL account to your real e-mail account.
Exchange Server
Exchange Server
If your organization uses Exchange Server, version 5.0 and later supports POP3 which is needed to use Info Select e-mail. If you use an earlier version of Exchange Server you will need to upgrade if you want to use Info Select e-mail with Exchange Server.
[:] To configure Exchange Server for use with Info Select e-mail:
- At the server run the Exchange Server Administrator program.
- Go to the Protocols container for your site.
- Double-click on the POP3 protocol object.
- Check Enable protocol.
- On the Authentication tab check all checkboxes.
- Close the POP3 properties window.
You may need to add an entry in the Internet Mail service.
[:] To add the Internet Mail entry:
- Open the Internet Mail Service window.
- Select the Routing tab. You should see Reroute Incoming SMTP Mail selected and you should have an entry in the routing window showing your own e-mail domain as . If you do, you do not need to do anything. If you do not have this entry, click Add, type in your domain name, and select Should be accepted as Inbound.
- Click OK to close the various windows including the information screen about DNS.