Outlining
This section describes the ways of viewing and organizing data in outline form.
Intro to Outlining
Intro to Outlining
The Selector is your control center for viewing and organizing data in outline form. It provides a tree-like representation of your data for fast and convenient access. For example, you can organize data on a certain project by dividing it into topics and sub-topics.
You can view the contents of any item listed in the Selector. For example you might wish to view a Note you wrote about how to use a modem.
[:] To view a specific item:
- In the Selector, click the item. You can then view the contents of the item in the Workspace.
You can browse through your information.
[:] To browse through data:
- Press the UP-ARROW or DOWN-ARROW key or press the HOME or END keys to move to the top or bottom of the Selector. As you browse you will see the selected item displayed in the Workspace.
Outlining to organize
About Outlining
You can organize your data in many ways. For example, you might wish to organize your data into customers, vendors, advertisers, sales leads, correspondence, and personal data. To organize this way you would create a separate Topic for each category. A CEO might organize the Selector by department; a Chef by the food type; a Salesperson by region and so on. Find what works best for you as you enter your daily information. Structuring your data is an ongoing process. Don’t worry if the structure you choose is not perfect at first. Your structure can always be changed and improved as you learn and enter more information.
You organize data by creating Topics. For example you might create a Topic called “Letters to Harry”.
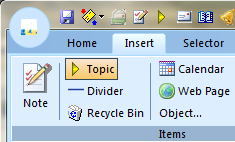
[:] To create a new Topic:
- Choose Menu Ribbon | Insert | Topic (or press F11).
- Type a description (caption) and press ENTER.
You can create as many Topics as you like. After you create a Topic you can drag data to the Topic just as you would place a piece of paper in a labeled folder. Topics can contain Notes or any other data items – including other Topics. For example, you might create a Topic “Correspondence with Smith”, then inside that Topic create a sub-item, “Urgent matters”. Topics can also be used to create outlines, such as a business plan or presentation.
Tip: You can insert Dividers in order to separate Topics in the outline.
Expanding and Collapsing
Expanding and Collapsing
Items showing a triangle icon contain information just like paper folders. You can expand or collapse an item showing a triangle icon to show or hide the item’s contents or sub items just as you would open or close a paper folder.
When you click a triangle icon, the item expands to show the sub items and the triangle icon will point down ![]() . Click the triangle again to collapse the item and hide the sub items – the triangle icon will point to the right
. Click the triangle again to collapse the item and hide the sub items – the triangle icon will point to the right ![]() . Collapsed items, though hiding their sub items, still contain those sub items. For example, if you move a collapsed item, its sub items will move along with the parent item.
. Collapsed items, though hiding their sub items, still contain those sub items. For example, if you move a collapsed item, its sub items will move along with the parent item.
When an item with a triangle icon is expanded you can see the information contained within that item in the Selector as lines indented to the right of the parent item. Collapse items that you are not working on to see a better overview of your data.
[:] To expand or collapse an item:
- In the Selector, click the triangle icon; or select the item and press the SPACEBAR; or double-click the text caption; or use the LEFT or RIGHT ARROW keys on the keyboard.
Caption editing
Editing Captions
The text that appears to the right of each icon in the Selector is called a caption. You can edit these captions.
[:] To edit a caption in the Selector:
- In the Selector, click the caption.
- Press the F2 or ENTER key. A blinking cursor appears at the beginning of the caption text.
- Type in your changes and press ESC to finish editing.
Tip: You can set captions to Bold, Italic or Underlined by clicking on the corresponding toolbar buttons.
If you want to enter caption editing mode by clicking on the caption and holding mouse button for a second, check Menu Ribbon | Home | Options | Misc | Allow me to edit captions using a single click .
While editing a caption you can press CTRL + D to date stamp or CTRL + M to time stamp.
Tip: You can setup Stamping options by choosing Menu Ribbon | Home | Options | Stamping.
You do not have to assign a caption to a Note. The first line of text in a Note will automatically be displayed in the Selector preceded by a quotation mark, distinguishing it from a deliberate caption. Such captions are called Literal Captions. (Literal captions are treated like deliberate captions for sorting and other commands.) You can disable Literal Captions by unchecking Menu Ribbon | Home | Options | View | Selector | When I don’t enter a caption, show first line of Note.
You can align caption text in columns by using the TAB key while editing the caption.
Note: When editing a caption, pressing DELETE at the end of the line or BACKSPACE at the beginning will join the items.
Moving Items
Moving Items
You can rearrange items in the Selector. For example, you can move a Note item from a Topic titled “Hot Leads” into a Topic titled “Customers”. The are a few ways to move items.
[:] To move an item by dragging:
- In the Selector, click and hold the left mouse button on the item and move the mouse up or down. You will see a marker move as you move the mouse.
- Drag the item until the marker is at the location where you want to place the item. Note that the marker can be in three positions – centered on the item, between two items, or just to the right and below an item. If you place the marker on the center of a collapsed Topic and release the mouse button, the item will be placed inside the Topic. Otherwise the item will appear at corresponding location in the Selector.
Note: Items cannot be placed above the fixed Overview Topic.
You can copy items from one place to another by holding down the CTRL key while dragging the item in the Selector. You will see an icon with a plus sign on the mouse cursor, indicating that the item will be copied.
If you find that your mouse pointer does not smoothly drag items in the Selector, you may need to clean your mouse ball and pad. Washing both in soap and water will remove oil and particles that reduce traction. Consult your mouse’s instruction manual in case the manufacturer recommends an alternate method.
You can use the keyboard to move items. You might find this method faster.
[:] To move items using the keyboard:
- Highlight the item in the Selector.
- While holding down the ALT key, press the UP, DOWN, LEFT, or RIGHT ARROW keys to move the item up or down one space at a time or left or right. To move an item to the top or bottom of a Topic, press ALT + HOME or ALT + END.
You can move an item into the next or previous Topic by keyboard.
[:] To move an item into the next or previous Topic:
- Press ALT + PGDN or ALT + PGUP. The item will disappear but will become available upon expanding the next or previous Topic.
You can move items using the Cut, Copy, and Paste commands. This method is often convenient when the destination is not visible on the screen.
[:] To move an item using Cut and Paste:
- In the Selector, choose the item.
- On the Menu Ribbon click Cut button (CTRL + X).
- Select the item above the desired destination location.
- On the Menu Ribbon click Paste button (CTRL + V).
Advanced Note: If you copy (not Cut) a Topic to the clipboard while in the Search Filter, only the sub items in the Search Filter will be copied, and the topic’s caption will contain the text “[Filtered]”.
Indentation
Setting an Item’s Indentation
You can promote (shift to the left) or demote (shift to the right) items in the Selector. Use these commands to change the indentation of items and to organize your data into outlines.
[:] To Promote or Demote an item in the Selector:
- In the Selector, choose the item. If you are selecting a Topic which is expanded, collapse it.
- Choose Menu Ribbon | Edit | Move | Left (ALT + LEFT ARROW) or Right (ALT + RIGHT ARROW). The item’s icon will shift one place left or right.
You can promote all items in a Topic to move them out of the Topic. This is handy if you wish to remove a Topic but not its contents.
[:] To Promote all items within a Topic:
- In the Selector, choose the Topic and expand it.
- Choose Menu Ribbon | Edit | Move | Left. You will see a dialog box asking if you want to align the items with the parent.
- Click OK. All the items that were inside the Topic will be at the same level as the Topic.
Dividing and Merging Topics
Dividing and Merging Topics
You can automatically move data from one Topic into a new Topic based on a keyword. For example, suppose you have a Topic containing many random Notes and want to bring all items containing the name “Einstein” into a separate Topic. You could do this by creating a new Topic and dragging items containing “Einstein” into it, but this could be time consuming. Instead, use the Split command.
[:] To split a Topic based on a keyword:
- From the Selector, choose the Topic to be split.
- Click Menu Ribbon | Home | Search. The search dialog appears.
- Uncheck All Topics.
- Enter the keyword or words and click OK or press ENTER. The Search Filter will show the results of the search.
- Select the Topic to split.
- Choose Menu Ribbon | Selector | Split and confirm OK. A new Topic will be created containing the items from the Search Filter.
You can merge information from two Topics.
[:] To merge two topics:
- From the Selector, drag one Topic just below the other at the same indentation level as the first Topic.
- Select the first Topic.
- Choose Menu Ribbon | Selector | Join and confirm.
You can find duplicated items in a Topic provided the duplicates are at the same indentation level. For example, you might want to remove duplicates after merging two topics.
[:] To de-duplicate a topic:
- Highlight the topic in the Selector and press CTRL + F5. Info Select will display only duplicate items in the Search Filter.
- Delete any duplicates found in the Selector.
- Click the Menu Ribbon | Home | Filter and choose View All Items to deactivate the Search Filter.
Caption appearance
Setting caption appearance
You can set the color of caption text in the Selector. For example, you might want to set an urgent item to red or use bold for all telephone calls.
[:] To set the color of a caption in the Selector:
- Right-click the caption.
- Select Caption Color and choose a color.
or
- Choose a color in Menu Ribbon Home | Text color.
[:] To bold, underline, italicize, or strikeout a caption:
- Select the item in the Selector.
- Press CTRL + B (bold), CTRL + U (underline), CTRL + I (italics), or CTRL+ Shift + K (strikeout).
or
Choose Menu Ribbon Home | B (bold), Menu Ribbon Home | U (underline), or Menu Ribbon Home | I (italics)
To reverse a style change use the same command again. For example, to un-bold press CTRL + B again, or use the Remove Formatting feature.
Note: If the Topic is expanded, you will be prompted to apply caption formatting to the children item in the topic.
HotSpots
HotSpots
HotSpots™ are oval bars that appear in the selector. HotSpots provide an important way to make organizing information quick and easy and make it effortless to drop new items into the correct location in your outline without having to first expand Topics. HotSpots provide a visible doorway to subTopics hidden inside other Topics. HotSpots are shown horizontally across the Selector as ovals containing text. Because HotSpots are shown across the screen instead of down the screen they allow you to have far more categories visible at one time.
HotSpots allow you to:
- See more Topics at once by using screen space efficiently
- Access Topics that would normally be hidden inside collapsed Topics
- Avoid the need to use the Selector scroll bar
- Place new items in their proper Topic quickly
HotSpots are created by selecting a Topic and setting the Topic as a HotSpot. When a Topic is a HotSpot the Topic will appear even if the Topic’s parent is collapsed. To see the benefit of HotSpots choose several Topics that you use frequently and set them as HotSpots.
[:] To set an item as a HotSpot:
- Right-click the item and choose HotSpot. The HotSpot oval shape will appear in the Selector next to the parent Topic. For optimum screen use short caption text.
[:] To place an item in a HotSpot Topic:
- Drag the item to the HotSpot.
[:] To view the data in a HotSpot:
- Click the Hotspot.
[:] To set the color of a HotSpot:
- Select the Topic, not the actual HotSpot. The Topic is marked with a blue star icon. Right-click on the Topic, choose Caption Color, and select a color.
Tip: When HotSpots are on the line of a File, you may want to delete the caption to allow more space for the HotSpots.
Tip: A Bookmark feature may add more functionality if you wish to quickly locate the necessary item in the Selector.
Overview file
About the Overview
The Overview shown at the top of the Selector is a special item. The Overview is the File that stores all information you enter that is not assigned to a specific file. Items cannot be placed above Overview or at the same indentation level as Overview. You cannot remove or hide the Overview. You need access to the Overview to perform group operations on all your data. The Overview is analogous to the root directory of your hard drive, which you also cannot remove. The Overview file also can not be shared via Local Area Network.
Bullets and Numbering
Bullets and Numbering
You can add Bullets or Numbering to items in a Topic. For example, you may want to number the chapters in an article or print bulleted or numbered lists.
[:] To enable Bullets or Numbering for a Topic:
- In the Selector, choose a Topic.
- Choose Menu Ribbon | Edit | Numbering.
The drop-down Numbering Library appears:

- Choose the desired Bullets or Numbering style.
All items within the selected Topic will have Bullets or Numbers to the left of their captions.
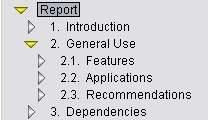
![]() Note: If the Topic is expanded, you will be prompted to apply the Bullets or Numbering to all subtopics within the selected Topic. Check Include number of parent Topic (multilevel numbering) if you want to allow hierarchical numbering, as shown here:
Note: If the Topic is expanded, you will be prompted to apply the Bullets or Numbering to all subtopics within the selected Topic. Check Include number of parent Topic (multilevel numbering) if you want to allow hierarchical numbering, as shown here:
[:] To disable Bullets or Numbering for a Topic:
- In the Selector choose a Topic.
- Choose Menu Ribbon | Edit | Numbering. Drop-down Numbering Library appears.
- Click None.
Dividers
Dividers
You can separate items by a horizontal Divider line. This provides an additional way to group information instead of using a collapsible Topic. For example, you can insert a Divider to separate your Home notes from your Work notes or Action items from Reference items.
[:] To insert a Divider
- In the Selector, choose an item
- Choose Menu Ribbon | Insert | Divider. A Divider will be inserted below the selected item.
- Type optional caption text and press ENTER.
Bookmarks
Bookmarks
Bookmarks save your spot to later use and provide an extra way of organizing your data. You can bookmark your items for quick access even if they are widely or deeply scattered in your Outline. For example you might bookmark a Note or Image you often use or a buried Topic containing reference information.
[:] To Bookmark an item:
- In the Selector, choose an item
- Choose Menu Ribbon | Selector | Bookmark | Bookmark (or press CTRL + ALT + A). A Bookmark icon
 will appear near the selected item.
[:] To find a Bookmark:
- Choose Menu Ribbon | Selector | Bookmark | Go To Next (or press CTRL + DOWN ARROW) or Go To Previous (or press CTRL + UP ARROW). You can filter all bookmarked items by choosing Menu Ribbon | Home | Filter | By Type | Bookmarks (or press CTRL + ALT + B).
To remove a Bookmark, highlight the bookmarked item and uncheck the Menu Ribbon | Selector | Bookmark | Bookmark option (or press CTRL + ALT + A).
The Context Pane
The Context Pane
The Context Pane is a portion of the screen that provides a quick way to save and change your view of your data by clicking on associated tabs. For example, you could save the selector state for a certain project. (Each Context Tab remembers which Files are open, which Topics are expanded/collapsed, which item was last in use, the state of pin-up windowsand the Search Filter state.)
![]()
Creating, Modifying and Deleting Context Tabs
You can create a new Context Tab whenever you wish to save the current Selector state.
[:] To Create a new Context Tab:
- Right-click in the Context Pane and choose New… to display the Context Pane creation dialog. Alternatively, click the Menu Ribbon | Selector | Context | New.
- Type in the Context Tab name and choose how Selector changes will be stored:Automatically – any changes you make to the Selector (e.g. expand/collapse Topics, Pin-Up items, etc.) will be saved to the current Context whenever a change is made;
Manually – to store the current Selector state you will need to right-click on the Context Tab and choose Save in the pop-up menu. - Check Do not open/close any Files during Context activation option to speed changing of contexts. With this option enabled, Info Select will not attempt to open or close any data files upon Context activation – but note that any information located in the closed files will not be displayed upon Context activation unless you open those files manually.
- Click OK. The new Context Tab will appear on the Context Pane as a new tab.
You can Delete a Context Tab when it is no longer needed. Deleting a Context will not erase the items within, only the Context Tab itself.
[:] To Delete an existing Context Tab:
- Right-click the Context Tab to be deleted and choose Delete.
You can save the current Selector state in any Context Tab.
[:] To Save the Selector state:
- Click the Menu Ribbon | Selector | Context | Save current context button.
or… - Create a new Context Tab.
[:] To Activate a Context Tab:
- Left-click on the necessary Context Tab
or… - Right-click on the necessary Context Tab and choose Select from the pop-up menu.
[:] To Modify a Context Tab:
- Right-click a Context Tab which is currently active and choose Properties…
- Make the necessary changes and click OK.
[:] To show or hide the Context Pane
- At the right top corner of the Info Select application window check or uncheck the “Show Contexts” button.
or
- Check or Uncheck the Menu Ribbon | Home | Tools | Options | Toolbars | General | Show Context Pane option.
To hide the Context Pane, right-click on it and choose Hide.
Context Tab order
To change the order in which Context Tabs appear on the Context Pane drag tabs with your mouse. A small vertical black bar will indicate the position where the Context Tab will be placed.
Outlining tips
Outlining tips
Creating good outline structures takes some practice. There are not many hard rules about how to structure outlines but the following ideas may be helpful. Some of the ideas below are intentionally vague.
- Don’t make your outline too shallow. For example, if your outline has only two levels you are probably not taking good advantage of more levels of indentation.
- Don’t make your outline too deep. If you have to go many many levels of indentation to get to the information you need you might be using too much nesting.
- Use categories that are invariant. For example, a Topic captioned “Clients” is likely to have a long life because you will continue to have clients for years.
- Pick a strategy. For example, you might want to classify by department: sales, accounting, marketing, etc. Or you might want to classify by customer or something else.
- Put things needing attention near the top of the Selector or the top of a Topic.
- Use Dividers to visually group different categories.
- Use Bookmarks to quickly access the most necessary items.
- Use Context Pane to save and recall the Selector states.
- Put reference items that do not need attention nearer the bottom of the Selector.
- Use HotSpots liberally so you can see more of your outline structure on one screen without scrolling.
- Use HotSpots to make it easier to drop items into the right Topic and avoid accumulating a long list of unsorted items.
- Use colors or bolding to help you quickly find often-used Topics.
- Learn the keyboard shortcuts so you can move and organize quickly via the keyboard.