Network
Intro to Networking
Intro to Networking
You can share and transfer data between co-workers. For example a group of users can share:
- Reference information
- Project notes
- Addresses and phone numbers
- Client info
- Customer orders
- Document drafts
- Form letters
- To-Do lists
- Current pricing data
- Meeting schedules
- A database of policies and procedures
- Conference room or vacation schedules
- Sales leads
- Bulletin board postings
- Etc.
Data is shared by placing data on a server disk drive accessible to all users. There are two methods of sharing data in Info Select.
File Locking
With File Locking, multiple network users can load shared files for viewing, but only one user can edit the file at a time. Because Info Select automatically releases files after a short delay, and because data can be divided into several small files, the limitation of one person editing at one time is often negligible.
Local Mail
With Local Mail you transfer Info Select data directly to other Info Select users. Local Mail works something like internet e-mail but it is faster and easier for transferring Info Select data.
Preparing the Server for File Locking
Preparing the Server for File Locking
You can share data using the File Locking method. First prepare the server by creating a subdirectory for shared files as follows.
[:] To create a server data subdirectory:
- From any workstation, run Windows Explorer.
- Select the shared drive root directory or any appropriate subdirectory (such as a general data directory) where you want to place the shared data files. You must select a directory to which users have read, write, delete and rename privileges. (See your LAN administrator for help setting access privileges. In simple peer-to-peer Windows networks, you can set access privileges as follows: run Explorer on the server; right-click the drive or subdirectory; and select Sharing.)
- Choose File | New | Folder.
- Enter the subdirectory name for shared Info Select data (e.g., InfoSelect) and press ENTER.
Next, create shared files on the shared drive using one or more of the following methods:
[:] To create new shared files:
- Go to any workstation and start Info Select.
- Choose Menu Ribbon | Selector | File | Shared File.
- Enter the path of the shared directory and file name. For example: e:\Info Select\ClientNames.wd3. Note that different paths can point to the same file. For example, \\SERVER\SHAREDDIR\SUBDIR\123.wd3 and S:\SUBDIR\123.wd3 might point to the same file. When sharing files use the same path specification on each workstation.
- Click OK. A file with the
 icon will appear in the Selector.
[:] To share an existing file:
- In Explorer, move the .wd3 file (but not overview.wd3) to the shared directory.
- In Info Select choose Menu Ribbon | Home | Open and select the file.
- Collapse the File.
- Choose Menu Ribbon | Selector | Change Into | Shared File.
You can set the time it takes to release a file after one user finishes editing.
[:] To set the file-release time:
- In the Selector, choose the File.
- Choose Menu Ribbon | Selector | Properties | Release After…. A dialog box appears.
- Enter the number of minutes the file should remain open without activity before it is automatically locked. If you expect many people to edit shared files frequently, enter a low value, perhaps 2 minutes. If you expect only a few people to Edit shared files occasionally, enter a higher value, perhaps 5 minutes.
- Choose Close if you wish the file to be automatically closed, or Make read only to make the file read-only.
- Click OK twice.
Preparing the Workstations for File Sharing
Preparing the Workstations for File Sharing
You can prepare a workstation (personal computer) for sharing and transferring data.
[:] To prepare a workstation for sharing data:
- Install Info Select to the workstation.
- Choose Menu Ribbon | Home | Open, browse to the shared directory, select the shared file(s), and click Open.
Advanced notes:
- To keep all data including non-shared data on a server, right-click the Info Select application launch icon, choose Properties | Shortcuts | Start In, enter the network path and move all data files to that path.
- You can start Info Select with a File other than OVERVIEW.wd3. Right-click the Info Select application launch icon, choose Properties | Shortcuts | Target, add “/O:” followed by the full file path (e.g., InfoSelect.EXE /O:”E:\InfoSelect\START.wd3″). However, each workstation must use a different startup file.
- You cannot share Overview.wd3, but you can share all your data by placing shared files under Overview.
- In network environments, if an Info Select data file has “right to modify” it must also have “right to create new ones” – otherwise data cannot be saved properly because a new file is created during the saving process.
Loading Shared Files with File Locking
Loading Shared Files with File Locking
You can load shared files for reading or editing. For example, you could open a File containing shared addresses to look up a client or add a new client.
[:] To load a shared file:
- If the File is already listed in the Selector, double-click the File. Otherwise: choose Menu Ribbon | Home | Open, select the file from the shared directory, and click Open.
Note: Launch shared files as shown above, not by double-clicking on the file in Explorer. Shared files should be closed or set to “Read-Only” state when not in use to allow co-workers to edit the file.
[:] To close a shared file:
- In the Selector, choose the File.
- Choose Menu Ribbon | Home | Open | Close. A closed File still shows in the Selector, however the caption is grayed out.
Files must be open to be included in a search. When no edits have been made to an open shared File for a few minutes, the File will be switched to view-only mode automatically – a ![]() icon appears in the Selector. You can request the file to be reopened again for editing.
icon appears in the Selector. You can request the file to be reopened again for editing.
[:] To reopen a shared file that has changed to view-only status:
- Click on the Read-Only
 icon or choose Menu Ribbon | Home | Open | Reopen.
To remove a shared File from being listed in the Selector, choose the File, choose Menu Ribbon | Home | Open | Close and press the DELETE key.
If you can’t reopen a shared file to turn off the read-only symbol, try the following:
- In Windows Explorer right click on the file, choose Properties, and uncheck Read-Only.
- Close Info Select and try to open the file in notepad to check for access issues.
- Try moving shared files to a temporary subdirectory so Info Select will not find them and then open the files one at a time from the temp directory via Menu Ribbon | Home | Open.
Local Mail
Local Mail
Info Select provides two types of mail – Local Mail and Internet e-mail. Local Mail allows you to instantly send any type of Info Select information to another user through your local network. For example, you can send Notes, Calendars, or entire Topic outlines. Note that you can send mail to users of Info Select version 2007 or later.
To prepare for local mail, first prepare each workstation (personal computer).
[:] To prepare a workstation for receiving Local Mail:
- Choose Menu Ribbon | Home | Options | Local Mail.
- Enable Check Local Mail Every option and enter how many minutes Info Select will wait before checking for new Local Mail.
- Enter the path to your Local Mail file in the box below (e.g. \\E:\SharedData\Info Select\eJohn.wd3 (use wd2 if any users have Info Select version 2007). Info Select will automatically create the file if it doesn’t exist. Click Browse to locate an existing file.
- Check When you get mail deliver it automatically if you want your Local Mail to be delivered automatically.
[:] To prepare a workstation for sending Local Mail:
- Choose Menu Ribbon | Insert | Topic.
- Type “Staff” and press Enter.
- Click the triangle to expand the Topic.
- Choose Menu Ribbon | Insert | File | Local Mail… and browse to the shared directory.
- While holding down the CTRL key select each of the Local Mail files (e.g. eJohnSmith.wd3, eMaryJones.wd3 or eJohnSmith.wd2 if any users have Info Select version 2007) except for the file corresponding to the workstation owner and click Open. For example, if the name of the workstation owner is “John Smith”, do not select the “eJohnSmith.wd3” or “eJohnSmith.wd2” file.
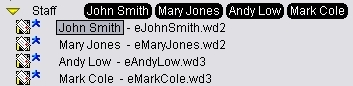
- On each person’s file right click and enable the HotSpot option. The “Staff” topic should look like on the image below:
- Collapse the “Staff” Topic.
Repeat the above steps on each workstation.
[:] To e-mail an item to another user via Local Mail:
- In the Selector, choose the item to send.
- Drag the item to one of the co-worker’s HotSpots near the “Staff” topic. If you want to keep a copy, hold the CTRL key while dragging.
or…
- Choose the item which to send
- Choose Menu Ribbon | E-mail | Send To File. A dialog box appears.
- From the list select the recipient(s). Check Leave copy in selector if you wish to leave a copy of the item you are sending in the Selector.
- Click OK.
Retrieving Local Mail
When you receive Local Mail, a tone is heard (Home | Options | Local Mail | Play Sound) and a red envelope icon ![]() appears on the status and task bars. If you click the icon, your mail will be displayed.
appears on the status and task bars. If you click the icon, your mail will be displayed.
To retrieve Local Mail automatically, enable Home | Options | Local Mail | Check Local Mail Every. To receive Local Mail manually, choose E-mail | Deliver Now | Local Mail.
Note: Use a separate shared Local Mail file for each machine (otherwise you will receive duplicate mail notifications).