Files
Intro to Files
Intro to Files
A disk file is data stored on your hard disk under a file name. An Info Select File is a portion of your Info Select data stored in a disk file on your hard disk. Info Select files have a .wd3 extension and appear in the Selector with a disk ![]() icon. In most applications, each time you create a new document you assign a new file name, but in Info Select you don’t assign a new file name when you create a new document because many items share the same disk file. All data is stored in a special file called Overview.wd3, unless you create additionial Info Select Files. If you do create additional Files you can segment your data as desired. For example you could put 100 items relating to financial matters iin a file financial.wd3.
icon. In most applications, each time you create a new document you assign a new file name, but in Info Select you don’t assign a new file name when you create a new document because many items share the same disk file. All data is stored in a special file called Overview.wd3, unless you create additionial Info Select Files. If you do create additional Files you can segment your data as desired. For example you could put 100 items relating to financial matters iin a file financial.wd3.
Info Select Data Files
Info Select Data Files
Files, indicated by a disk icon ![]() , store you data on your hard disk. You can create, delete and modify Files. For example you might want to create a File into which you move all your Topics, Notes, and other data relating to hardware matters.
, store you data on your hard disk. You can create, delete and modify Files. For example you might want to create a File into which you move all your Topics, Notes, and other data relating to hardware matters.
[:] To create a new Info Select data File:
- Choose Menu Ribbon | Insert | File | Data…
- In the File Name box enter a file name. If you want to use a different directory, type in the entire path (e.g., C:\Info Select G2\hardware.wd3). In the Save as Type box choose “Info Bases (*.wd3)“.
- Click Save.
- If desired, enter a caption and press ESC.
You can now move all your hardware information into this new File. To do so, drag items onto the File line in the Selector. When finished, issue the Menu Ribbon | Home | File | Savecommand.
You can save Files to another name or path. For example, you might want to save to a network drive the hardware.wd3 file created above.
[:] To save a File to a different name or path:
- In the Selector, choose the File.
- Choose Menu Ribbon | Home | Save | Save As… and enter a different file name or path.
- Click Save.
You can delete a File that you no longer need.
[:] To delete a File:
- In the Selector, choose the File to delete and collapse it.
- Press DELETE and select whether to delete the associated file on the disk. Choosing Selector will leave the File on your disk with all the information, allowing you to load the file later. Choosing Disk + Selector will place the file into the Windows Recycling Bin.
Which file your data is stored in
Every item in the Selector is stored in a File.
[:] To determine which file an item is stored in:
- Choose an item in the Selector.
- Press the LEFT ARROW key until you locate a File showing a floppy disk icon
 . The highlighted file indicates where the item is stored.
Recommended File Size
Recommended File Size
Files will grow as you add data into Info Select. If you create no additional Files beyond the default Overview file, all your data will be stored in overview.wd3, and that file will grow quickly.
It is recommended to avoid very small and very large Files. When a File is small (perhaps under 100,000 characters), you may benefit by converting it to a Topic to reduce the number of Files on your hard disk. When a File is large (perhaps over 5,000,000 characters), you may benefit by breaking the File into two or more Files. Files that are unusually large have several disadvantages:
- They take up unnecessary space on your backup media because a single change to data results in the archiving of a large file.
- They take more time to save.
- They can be too large to save onto a diskette.
- A defect could jeopardize a large amount of data.
- They are more prone to corruption.
Info Select will warn you when the file exceeds certain size by showing a warning message in the Special Messages box, and an ![]() icon will appear in the Selector near the file. You can set the desired maximum file size in Menu Ribbon | Options | Saving | General | Warn me if my files grow larger than X MB box.
icon will appear in the Selector near the file. You can set the desired maximum file size in Menu Ribbon | Options | Saving | General | Warn me if my files grow larger than X MB box.
Note: The above sizes are only rough guidelines – you can have Files as small or large as you wish.
You can view the data size of an Info Select File by right-clicking on an open File in the Selector and choosing Item Info… in the pop-up menu. The size shown is the number of characters on disk for the File. The information displayed on the Status Bar is the number of characters the data takes in memory, which may differ somewhat from the size on disk.
Note: To show the proper size of the File uncheck the Menu Ribbon | Home | Options | View | Selector | When showing a size of a File show size of any child Files option.
Pay particular attention to the size of the Overview File at the top of the Selector since it is the File most likely to grow too large.
Once you view the size of your Files, you can decide if any of them need to be combined or split and act as follows.
[:] When a File is too small:
- From the Selector, choose the File and collapse it.
- Choose Menu Ribbon | Edit | Change Into | Topic and confirm.
Note: When you convert a File into a Topic the data in the Topic is thereafter stored in another File. To determine which File the data is stored in, select the Topic and then press the LEFT ARROW key until you locate a File showing a floppy disk icon ![]() . That file is where the Topic will be stored.
. That file is where the Topic will be stored.
[:] When a File is too large:
- In the Selector, choose the File and expand it.
- Select a large sub-Topic, as indicated on the Status Bar, and collapse it.
- Choose Menu Ribbon | Edit | Change Into | File. The file dialog appears.
- Enter a name for the new File. The .wd3 extension will automatically be added. Press ENTER. The Topic will be saved in its own File, reducing the size of the parent File.
- Repeat steps 2 to 4 as needed.
Repeat these procedures until all your Files are an acceptable size.
Tip: The size of a File is the sum of all of its sub items, excluding any sub-Files. You need only be concerned about the size of Files, not Topics.
Opening and Closing
Opening and Closing
Although most of your data will normally be accessible from the Selector, there are situations where Info Select data might be located in a disk file that is not loaded into the Selector. For example, you might have copied a .wd3 file from another computer onto your hard disk. To view data from a file you must first Open the File.
You can open Info Select data files to load their data into the Selector.
[:] To Open a File:
- Choose Menu Ribbon | Home | Open. A dialog box appears.
- Select the drive and directory path of the File you want to open.
- From the Files of type box select Info bases (*.wd3) .
- Select the file name or enter the full file path and name.
- Click OK. The File with a disk icon will appear in the Selector.
Note: When opening an Encrypted file you will be prompted for the encryption password. The Release After… property will be automatically set for the Encrypted file so the file will be automatically closed in 5 minutes. This will protect your encrypted data from accidental exposure to unauthorized persons (for example, if you open the encrypted file and leave your computer). To disable the Release After… property right-click on the File, choose Release After… from the pop-up menu and uncheck the Automatically release file after … option.
If a File contains a large amount of data that you don’t plan to access or search in the near future, you can Close the File. Closing unneeded Files allows Info Select to operate faster.
[:] To close a File:
- In the Selector, choose the File.
- Choose Menu Ribbon | Home | Save | Close. The File will be grayed out, indicating it is closed.
To reopen a closed file double-click it or choose Menu Ribbon | Open | Reopen.
You can set selected Files to close automatically each time you restart Info Select. This way you will not need to remember to close Files to gain optimal speed.
[:] To close a File automatically on Startup:
- Right-click the File and check Close On Startup.
To locate all Files choose Menu Ribbon | Home | Filter | View By Type | Files and click OK.
To locate all Open Files choose Menu Ribbon | Home | Filter | View By Type | Open Files and click OK.
Note: You cannot close the Overview File. Closing a File does not remove it from the Selector. To remove a File from the Selector press DELETE and choose Selector.
Sending an item to a File
Sending an item to a File
You normally will use the mouse to drag items into Topics or Files. However in some situations you can work faster by placing items in a file without locating the file in the Selector.
[:] To prepare a file to allow sending items to the file:
- Select the file.
- Check Menu Ribbon | Selector | Properties | Allow Sending to File.
[:] To send an item to a file:
- Select the item to send.
- Choose Menu Ribbon | E-mail | Send To File… A dialog box appears.
- Select the file(s) to move the item to and click OK. Uncheck the Leave copy in selector option if you wish to move the item to the destination file.
Notes: If you send an expanded Topic, only its sub items will be transferred. If you send a Topic when in the Search Filter, only items in the Filter will be transferred. If you send an open File, the File will become a Topic in the destination File.
Reverting Data
Reverting Data
You can Undo changes made to a File since the last Save or since you last exited the application.
[:] To undo changes to a File:
- In the Selector, choose the File to revert (this File can be Overview).
- Choose Menu Ribbon | Home | Open | Revert. A dialog box appears.
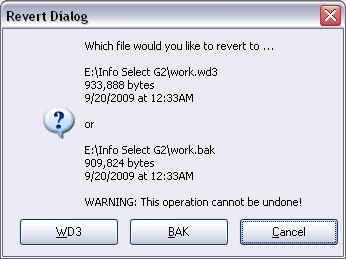
- Select the file to revert to and click OK.
[:] To undo changes to a File since your last auto-save:
This must be done before the next auto-save.
- In Explorer in the data folder (by default it is C:\Documents and Settings\\My Documents\Info Select G2) copy the file to any other name.
- In Info Select, choose the File.
- Choose Menu Ribbon | Home | Open | Close.
- Press DELETE and choose Disk + Selector.
- Choose Menu Ribbon | Home | Open and select the renamed file.
- If you want this File to replace the original, choose Menu Ribbon | Home | Save | Save As…, select the original file, and confirm to overwrite.
Note: The Auto-Save feature is configured under Menu Ribbon | Home | Options | Saving | General dialog.
Alternate Subdirectories
Alternate Subdirectories
You can setup a different directory for each user when several people are sharing one computer. Simply install Info Select for each user, specifying different directories (e.g., C:\Info Select G2\Mary). Run only one copy of Info Select at a time.
File Manager
File Manager
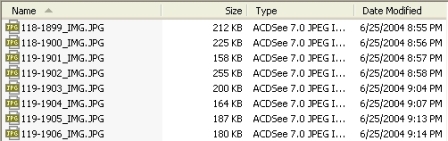
You can place views of disk drives or directories. For example, in a Topic containing notes about a Vendor you could place a view of a disk directory containing files associated with that vendor. Or in a Topic of notes relating to a co-worker you could show a view of a disk directory of files for that co-worker. Such File Manager views make it easy to drag file attachments from and to e-mails and to launch files.
[:] To create a File Manager view:
- Choose Menu Ribbon | Insert | File | File Manager.
- Choose a directory and click OK. The directory will appear in the Workspace.
You can create a new folder on disk:
[:] To create a new folder:
- Choose Menu Ribbon | Insert | File | File Manager.
- Click New Folder. A dialog box appears.
- Type the folder name (for example, C:\Project Data) and click OK.
You can launch files by double-clicking on them in the Workspace. You can drag files or directories to or from the File Manager. You can delete files by highlighting them in the Workspace and pressing DELETE. Drag the folder from the Workspace into Selector to create a new File Manager item showing this folder.