Reports
Intro to Reports
Intro to Reports
Reports allow you to extract or print information in a specific format that you can design. For example, you can use Reports to:
- Personalize form letters
- Address mailing labels
- Address envelopes
- Create e-mails
- Summarize data in a Database
- Merge any repetitive data with a master document.
You can specify the source of the information for the Report, such as a Database or series of Notes.
Preparing Report Data
Preparing Report Data
Before creating a Report, yo need to prepare the data. The Report feature can work with data placed in Notes, Forms or a Database.
Data in Notes
[:] To prepare your data using Notes:
- Enter your data into one or more Notes as in the following example:
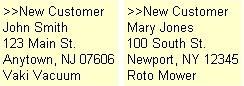
Remove blank lines between the Data Marker and the data and use a consistent format. For example, if one record has a one-line address and another record has a two-line address, pad the record with the one line address with a blank line.
When you create the Report Template in the next section, “John Smith” will be placed wherever the special symbol @1 appears on the report, since “John Smith” is the first line of text after the data marker. “Vaki Vacuum” will be placed wherever @4 appears on the report, since it is the fourth line of text after the data marker. If you do not enter a data marker, the first line of the Note will replace @1 on the report and so on. To use first and last names separately in the Report, place them on separate lines in the Note.
Data in Forms or Databases
To prepare data using Forms or Databases simply enter your data into one of these data types. To learn more about these data types click here.
Designing Reports
Designing Reports
Designing Reports
Before you can run a Report, you need to design it.
[:] To design a Report:
- Choose Menu Ribbon | Edit Insert | Database | Report.
- Enter a name for the Report and press ENTER.
- In Destination choose where you want the Report to go to: Selector or Printer or Clipboard or E-mail. Use Selector to direct the Report output to the Selector, Printer – to print the Report text, or Clipboard – to direct the Report output to the Clipboard so you can paste it to another application. Use E-mail to generate a topic of e-mail messages containing the Report text.
- If your data is in Notes enter the Data Marker text.
- Choose Menu Ribbon | Home | Print (you will not actually print at this time).
- Make any desired settings in the Print dialog and the dialogs reached via the buttons. For example, if printing addresses on envelopes select Envelope in the Environment drop list and uncheck Print Captions. If printing to labels review the settings under the Layout button.
- Choose Close to save the settings without printing.
- In the Workspace, compose your Report using one of the following methods.
When the data is in a Database or Topic of Forms
At the points where data is to be inserted in the Report, place curly braces around the name of the Database or Form field as in this example:

In the example, “Name” and “Product” are field names. Use double curly braces, such as {{Addr2}}, to suppress blank lines on reports.
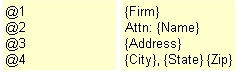
When the data comes from a Note
At the points where data is to be inserted, place the “@” symbol, followed by a number (up to 9), as follows:

When you want to create mailing labels:
Create a report like one of the following:
- Choose Menu Ribbon | Home | Print….
- Setup any desired settings under Printer and Layout. When printing from Database records check Break After Each Record.
- In the Print dialog click Close. The next section describes how to run the Report.
When you want a tabular reports where data is lined up in columns enter the field names enclosed in curly brackets { }, all in one line with one or more spaces to the right of the field name:
|
{Name }{Street }{City }{State }{Zip } |
Use enough spaces to allow for the largest data for each field. In the Report use a mono-spaces font such as Courier New.
Creating e-mail messages
When the Destination of the Report is E-mail, several additional fields appear in the workspace when the Report is selected: To, CC, BCC and Subject. Enter the necessary field names into these boxes. For example, if the e-mail address of the person is stored in the database field named “E-mail”, enter {E-mail} in the To field of the Report (or enter “@” symbol followed by a number (up to 9) if your data comes from a Note). Into the Subject field enter the subject of the e-mail message. Fill in the Report text as described above.
Running Reports
Running Reports
After the Report is designed and data is prepared, you can run the Report. For example, you might run a Report that prints the inventory stored in a Database, or generates “Thank You” e-mails to each of 100 customers listed in a Grid.
[:] To run a Report:
- From the Selector, choose the Note, Form, Topic, Database, or Database Record containing the data.
- Choose Menu Ribbon | Home | Print…
- In the Print dialog, check Report and select the desired Report name. Check As Single Note to output the Report into a single Note.
- Click OK. To stop processing click Cancel.
[:] To print labels from a database:
- In the Selector click Overview.
- Click Insert | Database\Grid | Report.
- Enter caption (e.g. Labels).
- In Destination select Printer.
- In the main report field enter something like:
{Name}
{Address}
{City}, {State} {Zip} - In the Selector click on the Database.
- Choose File | Print | Environment | Labels.
- Check Print Report and select the Labels report created above.
- Click Print.
Tips & Hints
Tips & Hints
You can apply reports to a sub-group of records in a Database. For example you might select all records contaning TX and then apply the report.
[:] To report on a sub-set of a database:
Use the Search Filter to get the desired records into the filter
Run the Report.
You can delete an unused report.
[:] To delete a Report:
- In the Selector, choose the Report.
- Press the DELETE key and confirm.
Intro to Summaries
Intro to Summaries
You can automatically extract specific information from all items in a Topic. For example, you could extract all text relating to George Washington from all your Notes. All the text mentioning George Washington would be placed in a new Note. The original text is not affected.
The collected information is called a Summary. You can base your summaries on data at certain line numbers in Notes or on lines containing a certain phrase. You can also use Summaries to show only the captions of your information in outline form.
Summaries can be manually edited into final reports and printed if desired.
Summarizing by Line Number
You can create a summary of a Topic by extracting captions or specific lines from Notes. For example, if you had several Notes which began with a client’s name and telephone number, you could quickly compile a list of client names and numbers by issuing the Summary command.
[:] To create a summary of a Topic by line number:
- In the Selector, choose the Topic.
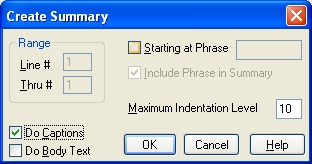
- Choose Menu Ribbon | Home | Tools | Summary…. A dialog box appears.
- Under Range, select the lines you want to include in your summary. Note that a line consists of all characters up to a hard return.
- Uncheck Starting At Phrase.
- Check Do Captions and check Do Body Text.
- Set Maximum Indentation Level to 10.
- Click OK. The Summary will appear as a new Note.
Summarizing by Phrase
You can create a summary of all information relating to a specific subject. For example, you could summarize all text referring to “Senator Smith” from a Topic of political articles. The Summary command would scan all Notes in the Topic and create a single Note. The Summary Note would consist of a series of lines or paragraphs each chosen because they contain the text “Senator Smith”. You could then edit this Note into a polished document. In this example, “Senator Smith” is the “Marker”.
[:] To create a summary of a Topic by a phrase:
- In the Selector, choose the Topic.
- Choose Menu Ribbon | Home | Tools | Summary…. A dialog box appears.
- Under Range, select lines 1 through 1. In special situations, you can request a wider range. For example, if you want to collect three line addresses preceded by “FAN CLUB”, specify lines 2 through 4 since the Marker is counted as line 1.
- Check Starting at Phrase and enter the phrase.
- Check Include Phrase in Summary if you want the phrase itself included in the Summary.
- Check Do Captions and check Do Body Text.
- Set Maximum Indentation Level to 10.
- Click OK. The Summary will appear as a new Note.
Summarizing Marked Text
You can summarize data that is not marked by a common word or phrase by inserting a common marker. You create a unique word or phrase Marker and place it before the text you wish to summarize. For example, to summarize the addresses of prospective customers place a unique phrase such as “CUST:” before each address.
[:] To summarize data that does not have a common word or phrase:
- In each Note, create a unique Marker word or phrase before the line or lines to be summarized.
- In the Selector, choose the Topic.
- Choose Menu Ribbon | Home | Tools | Summary…. A dialog box appears.
- Under Range, select lines 2 through N+1 where N is the number of lines at each Marker to be included in your summary.
- Check Starting at Phrase.
- Enter the desired Marker word or phrase.
- Uncheck Include Phrase in Summary.
- Check Do Captions and check Do Body Text.
- Set Maximum Indentation Level to 10.
- Click OK. The Summary will appear as a new Note.
Creating an Outline
You can create a Note showing in outline form only the captions of your information.
[:] To show only captions of your information:
- In the Selector, choose a Topic.
- Choose Menu Ribbon | Home | Tools | Summary…. A dialog box appears.
- Check Do Captions and uncheck Do Body Text.
- Set the Maximum Indentation Level to 10.
- Click OK. The Summary will appear as a new Note.
Tips & Hints
- Uncheck Do Captions to exclude captions from your Summary.
- Uncheck Do Body Text to exclude the text of Notes from your Summary.
- The Maximum Indentation Level sets a limit on how many levels an item can be indented to be included in the Summary. Set Maximum Indentation Level to 1 to include items indented only one level from the main Topic, 2 includes items indented two levels, etc.
- In addition to making a Summary of a Topic, you can also make a Summary of one Note when using a phrase-based Summary. Each line in the chosen Note containing your marker will be copied into the Summary Note.
- If you issue the Summary command while in the Filter, only the Notes in the Filter will be summarized.
- A “line”, as used in this section, includes all text up to the first hard return – which can be an entire paragraph.
- You can use the Sort command to sort your summary alphabetically or numerically.
- The Summary command will include data found in prior summaries.