Printing
Intro to Printing
Introd to Printing
You can print any item listed in the Selector onto sheets of paper, envelopes, labels, etc. You can specify columns, page breaks, page numbers, and hide text from printouts. You can preview the page before printing. You can use the print feature to send faxes too.
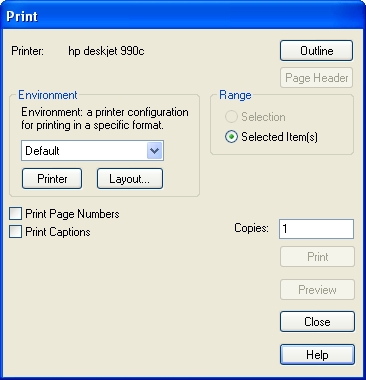
Printing is controlled via the Menu Ribbon | Home | Print… command which displays the Print dialog box.
Print Environments
Print Environments
Print Environments provide a way to name specific combinations of print settings. For example an Envelope environment might specify a large top and left margin.
Several Print Environments are provided so you can quickly change between the proper settings for stationary, labels, envelopes, etc. You can change the provided print environments according to your needs.
The default print Environments include:
| Name | Function |
| Default | Prints to the default printer using default settings |
| Stationary | Leaves room at the top of the page for printing on letterhead stationary |
| Notes | Allows multiple items on one page and turns on caption printing |
| Labels | For printing onto labels. Adjust the Layout settings for your type of labels. |
| Pocket Binder | Prints on a portion of a page so you can cut and put your printout into a pocket binder. |
| Envelope | For printing envelopes. |
| Line Report | For printing tabular reports. |
| Letter | For printing a standard letter – standard letter margins and no caption. |
| Fax | Prints to the fax device for sending letters and other information by fax. (Requires fax software.) |
| Multi-column | Prints in a multi-column layout. This often allows more information on a page by reducing white space. |
| A,B,C,D,E,F | Additional Print Environments that you can customize and use for special printing tasks |
Once you select a Print Environment from the list box, Info Select will remember that selection when you next print the same item. Although you cannot add new environments, you can change the names and settings of any environment.
[:] To alter a Print Environment:
- Choose Menu Ribbon | Home | Print….
- Select an Environment Name.
- Press the Layout button. A dialog box appears.
- Change the name in the Environment Name box if desired.
- Set the desired settings for the Layout dialog. The page layout image will change as you modify settings.
- Click OK.
- Click the Printer button.
- Make the desired settings and click OK.
- Set the desired settings in the Print dialog box and click OK.
Page Layout
Page Layout
You can change the page layout for each print environment including margins, whether you want more than one item to appear on one page, or to prepare to print to labels.
[:] To set layout options:
- Choose Menu Ribbon | Home | Print…. The Print dialog box appears.
- In the Environment box select the environment you wish to change.
- Click the Layout button. The layout dialog box appears.
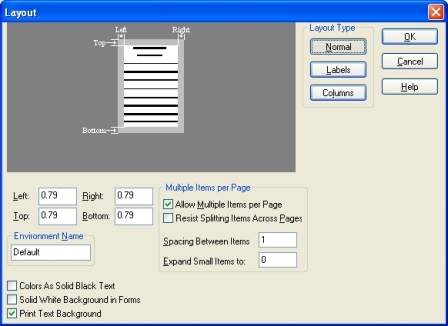
- Choose the desired settings for margins (in inches or centimeters depending on your Windows Control Panel settings). The page layout image will change as you modify the settings.
- If you want to change the Environment name, highlight it and type in a new name.
When printing more than one item at one time:
- Check Allow Multiple Items Per Page to print as many items as possible together on one page (without a page eject between each item).
- Check Resist Splitting Items to avoid splitting an item between two pages.
- Use Spacing Between Items to control how many inches or centimeters of blank space are placed between items.
- Use Expand Small Items To to control the spacing between small items; the space between items will be increased until the distance from the beginning of one item to the beginning of the next item is equal to this setting. For example, if you set this value to one inch, items that contain only a couple of lines will begin at one inch intervals.
- Click OK.
When printing items that contain colored text, to disable printing in color check Colors As Solid Black Text and disable Print Text Background.
Previewing and Printing
Previewing and Printing
You can print any item listed in the Selector.
[:] To print a single item:
- From the Selector, choose the item.
- If you want to print only a specific line or paragraph in the item, highlight the line or paragraph.
- Choose Menu Ribbon | Home | Print…. The print dialog box appears.
- Choose the desired Environment from the drop down list.
- To edit the Layout see Page Layout.
- To change the printer, click the Printer button, select the desired printer, and click OK.
- If you want the caption of the item to appear on the printout check Print Captions.
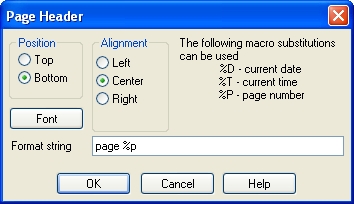
- To add page numbering check Print Page Numbers. Click the Page Header button to set the page numbering options. Select page header Position, Alignment, Font and Format string and click OK.
- Click Preview and check the result before printing. If the result is satisfactory click Close and OK.
[:] To print multiple items:
- From the Selector, select the items to be printed. If you want to print all the items in a Topic, expand the Topic.
- Choose Menu Ribbon | Home | Print…. A dialog box appears.
- If you want to print multiple items on one page, check Layout | Allow multiple items per page, and click OK.
- Click Preview and check the result before printing. If the result is satisfactory click Close and OK.
Notes:
You can also print multiple items by printing the Topic that contains those items.
To print multiple copies of a print job, enter the number of copies in the Copies box of the Print dialog box.
To cancel a printout while in progress, click Cancel in the Cancel Operation dialog box (the dialog box will appear on the screen during printing) or press ESC.
Printing Envelopes
Printing Envelopes
You can print onto envelopes.
[:] To print envelopes:
- If you are printing several envelopes at once, each Note containing an address must be positioned in the Selector directly beneath the first Note you want to print. For larger mailings, see “Reports“.
- In the Selector, select the Notes containing an address.
- Choose Menu Ribbon | Home | Print…. A dialog box appears.
- In the Environment drop down list, select Envelope.
- Click OK or press ENTER.
- Click Preview and check the result before printing. If the result is satisfactory click Close and OK.
To make adjustments for your particular envelope style and printer click the Layout button in the Print dialog and change the settings. You can also change the orientation to portrait or landscape by clicking on the Printer button.
Note: An Address Extractor template is provided to recognize and extract an address from a single Note.
Printing Labels
Printing Labels
You can print on sheets that have several labels or other forms on the page. For example, for a mailing you can print addresses onto address label sheets.
[:] To prepare to print labels:
- Choose Menu Ribbon | Home | Print…. A dialog box appears.
- Under Environment, select Labels and then click the Printer button. The printer dialog appears.
- Under Paper, select the paper size (8-1/2 x 11 for standard laser labels) and source. Click OK.
- Uncheck Print Captions and click Layout. A dialog box appears.
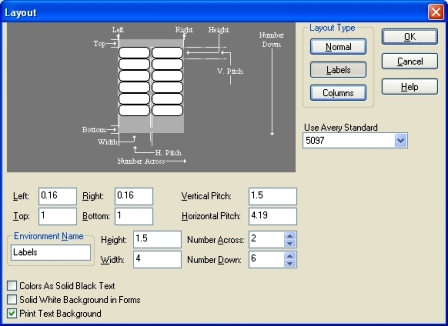
- Click the Labels button, choose an Avery label number or enter your specific settings, and click OK. The page layout image will change as you modify the settings.
- In the Print dialog box click Close.
[:] To print labels:
- In the Selector, select the Notes containing the addresses you want to print.
- Choose Menu Ribbon | Home | Print…. A dialog box appears.
- In the Environment drop down list, select Labels.
- Click OK.
- Click Preview and check the result before printing. If the result is satisfactory click Close and OK.
You can print multiple labels all having the same fixed information. For example you could print your return address for envelopes or a price sticker.
[:] To print multiple labels of the same information:
- In the Selector, create or choose a Note containing the fixed information.
- Choose Menu Ribbon | Home | Print…. A dialog box appears.
- In the Environment drop down list, select Labels.
- In Copies, enter the desired number of labels and click OK.
- Click Preview and check the result before printing. If the result is satisfactory click Close and OK.
Print control
Print control
Info Select version 11
You can set page breaks to force text to begin on a new page.
[:] To set a page break:
-
In the text of a Note to be printed, position the cursor at the point where a new page should begin.
- Choose Menu Ribbon | Note | Page Break.
You can block certain portions of text from being printed.
[:] To block certain text from being printed:
-
In the text of a Note, highlight the text that you want to block.
-
Enable Menu Ribbon | Note | Hidden Text.
[:] To switch hidden text viewing:
-
Choose Menu Ribbon | Note | Show Hidden Text.
Selecting a Printer
Selecting a Printer
You can select a printer to be used when printing items from Info Select. For example, you might need to print envelopes to a special printer located in a copier room.
[:] To Select a Printer:
- Choose Menu Ribbon | Home | Print…. A dialog box appears.
- From the Environment drop down list, make a selection.
- Click the Printer button. The printer dialog box appears.
- Choose a printer from the list box. Click Network… to select a Network printer. Select a print orientation and paper size if needed (see your Windows Users Guide for more information).
- Click OK.
Printing to a Pocket Ring Binder
Printing to a Pocket Ring Binder
You can print pages to be inserted in a portable ring binder.
[:] To print to standard 3-3/4″ x 6-3/4″ pages:
- Select the item or Topic to print.
- Load your printer with plain 8-1/2 x 11 sheets.
- Choose Menu Ribbon | Home | Print….
- In the Environment drop-down list, select Pocket 3.75 x 6.75 in the list box and click OK.
- Click Preview and check the result before printing. If the result is satisfactory click Close and OK.
- When the printout is complete, cut the pages on a paper cutter and punch binder holes.
For other portable ring binders try the formula below in the Layout dialog:
Left = 0.4″
Right = 8.5 – width (in inches) + .15
Top = 0.25″
Bottom = 11 – height (in inches) + .15
Faxing
Faxing
You can fax data from Info Select. For example, you might need to fax a price quotation to a customer.
[:] To fax an item:
- Make sure you have a Fax printer drive installed – see Windows help.
- Select the item to fax.
- Choose Menu Ribbon | Home | Print….
- From the Environment list box choose Fax.
- Click Printer, select your faxing device, and click OK.
- Click OK again.
Printing Columns
Printing Columns
You can print multiple columns of text. Printing in columns usually uses space more efficiently. For example, you might want to print a legal Agreement in two columns to try to fit the agreement on one page.
[:] To print multiple columns:
- In the Selector, choose an item to print.
- Choose Menu Ribbon | Home | Print…. The Print dialog appears.
- Choose the Multi-Column environment or any unused Environment name.
- Choose Layout | Columns.
- Set the desired number of columns in the Numbers Across box and Gutter spacing (distance between columns) and click OK.
- Click Preview and check the result before printing. If the result is satisfactory click Close and OK.
Note: If you want to print in multi-column format but do not want the screen display to be changed to a column, check Menu Ribbon | Edit | Properties | Wrap to Screen.
Printing Topics
Printing Topics
You are not limited to printing single items such as Notes. You can print Topics too even though Topics may contain sub items. When you print an expanded Topic, the sub items of the Topic will be printed separately (potentially, one per page). When you print a collapsed Topic, the Topic will print as an outline whose format is controlled via Menu Ribbon | Home | Options | Outline (see Changing Topics into Notes).
To print Topic captions only to a specific indentation level, use the Summary command. For example, you may want to print only the main items of a Business Plan outline and not the sub items.
[:] To print a Topic to a specific indentation level:
- In the Selector, choose the Topic.
- Choose Menu Ribbon | Home | Tools | Summary…. A dialog box will appear.
- Check Do Captions and uncheck Do Body Text.
- In Maximum Indentation Level enter the number of levels of indentation in the Topic you want to print. For example, enter “1” to include only the captions in the first level of indented items or “2” to print captions and items at the first level of indentation.
- Click OK. A new Note with the selected captions will be created.
- Choose File | Print… and click OK.
Note: Caption font and style is not printed.
Tips
Tips
When printing it is helpful to understand the issues listed below.
Use True Type fonts
Use True Type fonts for text – those with the TT icon in the Font dialogs. Non True Type fonts may not print as shown on the screen.
Use tabs or mono-spaced fonts for alignment
If you have text that requires precise alignment in vertical columns, consider using tabs in place of spaces or applying a mono-spaced font (such as Courier New).
Printing Forms and Fields
To print a Form, be sure to click the Form rather than one of its fields in the Selector. To print only one field, choose the specific field in the Selector. Choose Menu Ribbon | Home | Print | Layout and check Solid White Background in Forms if you want the backgrounds of the Form fields to be printed in white color.
Printing in Color
To enable printing in color, choose Menu Ribbon | Home | Print | Layout and uncheck the Colors as Solid Black Text option. To enable printing text background check Print Text Background option.
Headers and Footers
You can add Headers and Footers to the Notes you wish to print (e.g. a letter with your company’s address). For such purpose, create a Template with the necessary Header and Footer, and use this Template to create new Notes.
Troubleshooting
Troubleshooting
If you are having difficulties printing, here are some things to try:
- Close Info Select and reopen it.
- Restart Windows.
- Create a trivial Note and try to print it. If the simple Note prints properly, try to narrow down which part of the item is causing the print problem.
- Try a similar print task in another application. This helps indicate whether a problem relates to Info Select or the printer driver or hardware.
- Check all the settings in the Print dialog box and the dialogs reached from the buttons in the Print dialog box.
- Choose Menu Ribbon | Home | Options | Defaults and click Restore default printer settings.
- Close Info Select. Go into Explorer. Select the C:\Program Files\Info Select directory. Find the file named InfoSelect.INI and double click to edit it. Remove the Printer Environments section. File | Save. File | Exit. Run Info Select again. Warning: this will erase any specific printer settings.
- Try renaming InfoSelect.INI to InfoSelect.SAV but this will disable all settings, including email configurations.
- If a certain printer selection crashes Info Select, or items are printed spontaneously, try closing Info Select and editing the InfoSelect.INI file as described in step 7. Choose Start | Settings | Printers and delete your default printer. Reinstall printer drivers, and then try restarting Info Select.
- See if the manufacturer has an updated printer driver at their web site and download it.
- Try printing to another printer.
If you are having difficulty getting a printout to match the formatting on the screen, here are some things to try:
- Make sure Edit | Properties | Wrap to Screen is not checked.
- Make sure Edit | Properties | Support Text Forms is not checked.
- If you are manually formatting paragraphs using spaces or tabs and hard returns try making a slightly wider margin (move some words at the end of each line to the beginning of the next line).
- Choose Menu Ribbon | Home | Print | Layout and decrease the Left and Right margins.
- Make sure you are using a True Type font. Terminal, Courier and Fixed Sys, for example, are not True Type fonts.