Intro to Windows and Frames
When you choose an item in the Selector, the contents of that item appears in the Workspace at the right side of the screen. The item can appear in a window that fills the Workspace or in a sizeable window that takes only a portion of the Workspace. For each item, you can set the type of window frame, its position, background color, and size.
Changing Frames
Changing Frames
You can maximize an item’s frame. For example, you might want to set the frame of a Note containing a large document to fill the Workspace. When a window is maximized, it gives the desktop an uncluttered appearance and resizes automatically with changes in the width of the Selector.
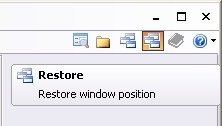
[:] To switch an item’s frame to maximized:
- From the Selector, choose the item
- In the top right corner of Info Select window uncheck the Restore window position button
or
- Check | Properties | Maximized Frame. The frame should now fill the full Workspace. If not: in the Selector select and collapse the parent Topic; check Menu Ribbon | Edit | Properties | Maximized; and repeat for the parent’s parent, etc., until you reach the Overview.
You can make an item’s frame sizeable. For example you might want a few Notes to appear side by side.
[:] To switch an item’s frame type to resizable:
- From the Selector, choose the item.
- In the top right corner of Info Select window check the Restore window position button or uncheck Menu Ribbon | Edit | Properties | Maximized Frame. Then you can resize the window frame using the mouse.
Moving and Sizing Windows
Moving and Sizing Windows
You can move or resize windows in the workspace. For example, you might want to move action items to the top of the workspace and reference information to the bottom.
[:] To move a window:
- Using your mouse, drag the caption to the desired location.
[:] To resize a window:
- Using your mouse, drag the edge or corner of the frame.
Pinups Windows
Pinups
A Pinup windows works like tacking a note on a bulletin board – the window stays in view regardless of which other items you choose in the Selector. You can pinup any window and any type of item can be pinned-up, including Notes, Calendars, Forms and Topics. For example you could pinup a window with reference info or a window you are editing.
[:] To pin-up an item:
- From the Selector, choose the item.
- Enable Menu Ribbon | Selector | Pin-up option or right-click the item and choose Pin-Up.
To move the Pinup item, drag the title bar of the Pinup window.
To unpin an item In the title bar of the Pinup window, click the ![]() button.
button.
To find the location in the Selector of the Pinups choose Menu Ribbon | Home | Filter | By Type | Pinups and click OK.
Note: A Pinup window can be moved anywhere on the screen, including outside the Info Select application area or can be docked at a convenient location at the top, bottom, left or right of the Workspace or Selector window. Pinups will minimize when the application is minimized.
Tiling Windows
Tiling Windows
You can automatically arrange Workspace windows side-by-side. For example, you may need to view many small items at once in the Workspace.
[:] To tile items in the Workspace:
- In the Selector, choose a Topic.
- Collapse the Topic.
- Choose Menu Ribbon | Selector | Properties | Auto Arranged. Sub items of that Topic will be automatically arranged in the Workspace
Docking Frames
Docking Frames
Docking a window means to snap the window frame to the edges of another window. You can dock any frame at the top, bottom, left or right of the Workspace or Selector window. For example, you may be editing an article and dock a Note containing quotes at the top of the Workspace for reference.
[:] To dock a frame:
- Pin-up the item.
- Click the caption of the frame and start dragging. The Docking Markers will appear:

- Position the mouse cursor onto one of the docking markers. The area where the frame will be docked will be highlighted as shown on the image below.
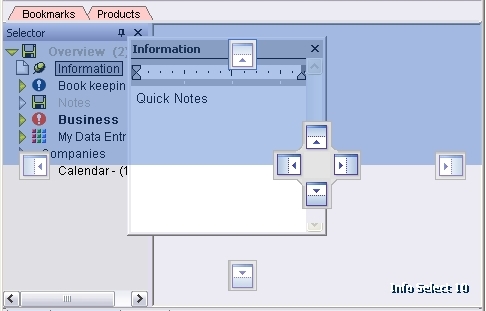
- Release the mouse button to dock the frame.
Note: You can dock any frame either in the Selector or Workspace part of the screen.
You can auto-hide a docked frame when not in use.
[:] To set a docked frame to auto-hide
- Click on the Auto Hide button in the title bar of docked frame so that pin is pointing to the left.

The window will now automatically hide itself when it is not being used. To show the docking window again, move the mouse over the window’s placeholder.
Nesting Windows
Nesting Windows
You can place one window inside another. For example, use nested windows to create:
- Forms with fields
- Documents with text boxes
- Items you want to view simultaneously.
[:] To nest windows:
- Check Menu Ribbon | Home | Options | View | General | Allow me to nest windows in the Workspace.
- Highlight a Topic which contains the items to nest, or create a new Topic.
- Uncheck Menu Ribbon | Selector | Item Properties | Auto Arranged.
- For the main Topic and each sub item, collapse the Topic or sub item and uncheck Menu Ribbon | Selector | Item Properties | Maximized Frame.
- In the Workspace, resize the window corresponding to the main Topic.
- Resize the windows corresponding to the sub items so they are small enough to allow two or more to fit inside the window of the main Topic.
- You may need to choose an item in the Selector above the main Topic and then choose the main Topic again to refresh the display.
Background Colors
Background Colors
You can change the Workspace background color of an item. For example, you may want an urgent Note to appear with a yellow background.
[:] To change an item’s background color in the Workspace:
- From the Selector, choose the item.
- In the Workspace right-click in the window and choose Background Color.
- Select the desired color.
For more information about default colors click here.