Start
This section will help you get started using Info Select.
Concepts
Essential Concepts
This documentation assumes knowledge of standard Windows terms such as dialog box, scrollbar, window frame, checkbox, etc. If you are unfamiliar with these terms, refer to your Windows User Guide.
To use Info Select it is important to understand some key concepts.
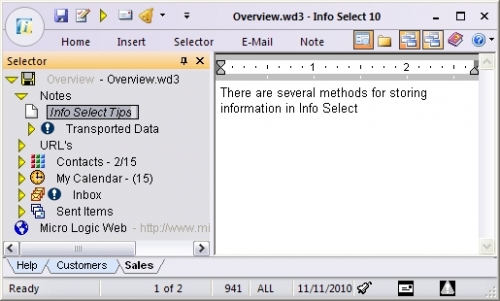
The Info Select screen is divided into two main areas. The large area on the left side is called the Selector. The Selector is where all your data is organized in list or outline form. The Selector window can be dragged around the screen and placed at a comfortable position, or docked on the left, top, bottom or right of the Workspace. The Selector window can be also completely hidden, or made available as a pop-up window.
The large area on the right side is called the Workspace. This is where you view and enter much of your information. The Selector and Workspace are separated by a vertical or horizontal line (depending on the Selector position). You can change the size of the Selector and Workspace by dragging the dividing line to the left or right (or top or bottom) with your mouse.
The Menu Ribbon located on the top of the Info Select screen replaces the menu and toolbar and provides controls for most of the application functions. The Ribbon is designed to help you quickly find the commands you need to complete a task. Commands are organized in logical groups, which are collected together under tabs. Each tab relates to a type of activity, such as writing or laying out a page. To reduce clutter, some tabs are shown only when needed. For example, the Note tab is shown only when a Note is selected.
Some command icons can be expanded and contain additional commands in the drop-down list which appears when you click on the small arrow pointing down. Click here to learn more about the menu ribbon.
You can use Info Select to enter, organize, and manage assorted daily information. Info Select provides several methods for storing your valuable information. The two most common methods are Notes ![]() and Topics
and Topics ![]() . Notes are generally used when you need space for free-form text – such as a memo or business letter. Notes are viewed in the Workspace. Topics are used to classify information or for information that would appear in a list. Topics are viewed in the Selector.
. Notes are generally used when you need space for free-form text – such as a memo or business letter. Notes are viewed in the Workspace. Topics are used to classify information or for information that would appear in a list. Topics are viewed in the Selector.
Every Note, Topic, or other item you create can have a caption – a single line of text describing the item. For example, for a Note containing a memo to a client you might use the client’s name as the caption – John Smith. Captions appear in the Selector. To the left of each caption is an icon indicating the item type. For example, an icon of a sheet of paper ![]() indicates a Note and a triangle
indicates a Note and a triangle ![]() indicates a Topic. Click Types of Data for more information about the Info Select icons
indicates a Topic. Click Types of Data for more information about the Info Select icons
Every Note can be pinned-up to be displayed in a floating window. Such windows can be positioned elsewhere on the screen, or docked at a convenient location on a screen.
You can use the Calendar item to schedule and store various appointments or events. Use Databases items for storing structured information like Contacts, Stock information, invoices, etc.
The Selector has several uses. You use the Selector to enter, view, and edit captions. The Selector shows a list of all captions and provides an overview of your information. The listing of your data in the Selector can be a simple listing (like a shopping list) or an outline, with multiple levels of indentation. Use the Selector to access and organize your data. You can organize your data by moving items up or down in the Selector by dragging them with your mouse. When you click on any item other than a Topic, you will see the contents displayed in the Workspace, where you can view or edit the item. The Context Pane allows you to save different Selector states, for example when you are working on several projects and need to change quickly between them.
Commands impact items that are highlighted in the Selector. For example, if you want to delete an item, first highlight the item in the Selector by clicking on it, and then press the DELETE key.
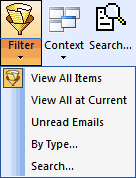
Over time, you may accumulate hundreds or thousands of items in Info Select. Info Select allows you to find information quickly using its advanced search capability. You can search for information based on a person’s name, a word, a number, or any other text. When a search is complete, a Search Filter is created and only those items that meet the criteria of the Search Filter are shown in the Selector. The Filter button in the toolbar changes color when the Filter is active.
 .
.
You must click this button or click the down arrow and select View All Items (F4) to remove the Filter and view all your information again. Choose View All at Current to remove the Filter and stay positioned on the highlighted item.
You can use Info Select on your Local Network to share data with co-workers. For detailed information and setup instructions please see Network section.
Types of Data
Types of Data
Info Select gives you flexibility in storing and dealing with your daily information. You can select the best method to use for each item of information by choosing from the Insert menu. Following is a summary of the types of data:
| Icon | Name | Function | Examples |
| Note | Free-form text | Documents, correspondence, reports, basic word processing, etc. | |
| Topic | Categories; short notes; containers for data. | Category – “Notes on Smith”; short one line note – “Finish memo today”; name of a list – “Things to purchase”; elements of a list – “#6 bolts”. | |
| Empty Topic | Categories; short notes; containers for data. | Category – “Notes on Smith”; short one line note – “Finish memo today”; name of a list – “Things to purchase”; elements of a list – “#6 bolts”. | |
| File | A disk file holding Info Select data | My financial notes – C:\Info Select G2\financial.wd3 | |
| Local Mail File | A file for sending and receiving Local Mail | A Local Mail file for John Smith – E:\SharedData\Info Select G2\eJohnSmith.wd3 | |
| Shared File | An Info Select data file shared with co-workers over a network | Company policies – E:\SharedData\Info Select G2\policies.wd3 | |
| E-mail Attachment | Info Select data attached to an e-mail message | A database to be included with an e-mail message. | |
| Selector Attachment | External file stored in the Info Select | A Word document. | |
| File Manager | A method of viewing and managing files from Info Select | A view of a file directory containing all files associated with a specific project. | |
| Form | Loosely structured data in fields | A place to enter names and addresses, invoices, etc. Records can be moved away from each other. | |
| Database | Tightly structured data in fields | A place to enter names and addresses, invoices, etc. Records must remain with each other. | |
| Record | One entry in a database | John Smith’s address in an address database. | |
| Report | A layout for a database report | A layout for a printout showing the item descriptions in an inventory database. | |
|
|
Text Field | A text entry field on a form or database | Last Name in an address data base. |
| Numeric Field | A numeric entry field on a form or database | Quantity In Stock in an inventory database. | |
| Date Field | A date entry field on a form or database | When Purchased in a purchasing database. | |
| Currency Field | A currency entry field on a form or database | Value Each in an inventory database. | |
| List Field | A field containing pre-defined values | A list of units in an inventory database (Pieces, Packs, Gallons, etc.) | |
| Check Field | A checkmark field that can be checked or unchecked | A field in an inventory database indicating that the item was purchased. | |
| Image Field | A field containing an image | A photograph of the employee in the staff database | |
| Main Calendar | Personal event scheduler | Your main Calendar where you store personal events, birthdays, etc. | |
| Calendar | Event scheduler | Calendar for the R&D department. | |
| Calendar Task | A view of the Calendar appointment in the Selector | An appointment to visit the dentist on 12/15/2009 from 2.00 PM to 3.00 PM. | |
| Outgoing E-mail Message | Internet message ready to send | A message to John Smith. | |
| Incoming E-mail Message | A received e-mail message | A message from Andrew Jones | |
| Sent E-mail Message | An Internet message that was sent | A sent message to John Smith. | |
| Outgoing HTML E-mail Message | Internet email message in HTML format ready to send | A message to John Smith in HTML format – HTML messages can appear like web pages. | |
| Incoming HTML E-mail Message | A received e-mail message in HTML format | A message from Andrew Jones in HTML format – with advanced formatting like web pages. | |
| Sent HTML E-mail Message | An Internet message in HTML format that was sent | A sent HTML message to John Smith. | |
| Unsuccesfully Sent E-mail Message | An Internet message that was not sent successfully | A messages which was sent to an incorrect address | |
| E-mail Delivery | A place where e-mail is delivered and stored | johnsmith@company.com. Messages from Mr. Smith will automatically be placed into his Delivery. | |
| Group Delivery | An item storing a list of recipients for a large e-mailing | An e-mail distribution list for announcing a new product or service to your customers. | |
| E-mail Filter | A place where e-mail is automatically sorted | A place to collect all messages where the Subject contains “brochure request”. | |
| OLE | A link to data created in another application | A CAD drawing stored in Info Select along with related notes. | |
| Recycle Bin | A place to store data that you are not ready to fully delete. | Finished tasks for the Alpha project. | |
| Web Page | A bookmark and viewer for a specific web address | A view of www.miclog.com inside Info Select. | |
| Image | A bit map image | A picture of a new device scanned from a magazine. |
Additional icons that modify the meaning of the basic types of data are:
| Icon | Description |
| Read-only – cannot be edited currently | |
| Non-accessible File – Info Select can’t find the file or the attributes for the file are set to Read-Only by the operating system. | |
| Extra Large File – File size exceeds the limit specified in Menu Ribbon | Home | Options | Saving dialog. | |
| A Shared File is available for editing | |
| Item is pinned-up in a fixed window | |
| Item appears on the Template menu | |
| Default Template – a model for new items | |
| Search Barrier – will be ignored in a search | |
| ToDo item | |
| Bookmark item – an item, bookmarked for fast access. | |
| Checkmark item | |
| Linked item – an item which is linked to another item or Calendar task | |
| Locked from deleting – an item was locked from deleting or contains a locked sub-item | |
| Selector Tickler – a tickler listed in the Selector | |
| Selector Alarm – an item in the Calendar which recently became active | |
| Auto Sorted topic | |
| Show Field (Record) view – click this icon to switch between the Field and Record views of the Database or Grid (appears when Database or Grid is expanded). | |
| Delivery confirmation – Indicates that an incoming message requested confirmation of delivery. A confirmation message will automatically be mailed to the sender. | |
| Encrypted message – Indicates that the e-mail message is encrypted. | |
| Form Reply – Indicates that the note is used as a Form Reply for e-mail. | |
| Unread e-mail message. | |
| Selector Ticklers topic – contains Selector Ticklers. Created automatically by Info Select. | |
| Transported Data topic – contains data brougt into Info Select via the Transporter feature. Created automatically. | |
| Inbox – a topic which accumulates all new e-mail messages if there is no Delivery for the e-mail sender. Created automatically by Info Select. | |
| Sent Items – a topic which accumulates sent e-mail messages if using the E-mail | Send command. Created automatically by Info Select. |
Don’t be concerned about remembering all the icons – you can determine the meaning of any icon simply by pointing to the icon with the mouse cursor. After a brief delay, a tool tip will explain the meaning.
Tutorial
General Tutorial
The following tutorial will help you get started using Info Select. This tutorial is for both new users and those upgrading from an earlier version of Info Select. Before trying each step, bring focus to Info Select.
Info Select button
The user interface has been redesigned in Info Select 10. The File menu has been replaced with the Info Select button. When you click the Info Select Button, you will see the basic commands to save data, insert a new Note, Topic or E-mail Message. Some commands, such as Print, have been moved to the Menu Ribbon.
Note: No option is currently available to switch the user interface back to the File menu, toolbars, and commands as they appeared in earlier versions of Info Select.
Menu Ribbon
The menus and toolbars in Info Select 10 have been replaced with the Ribbon. The Ribbon is designed to help you quickly find the commands that you need to complete a task. Commands are organized in logical groups, which are collected together under tabs. Each tab relates to a type of activity, such as inserting Selector items or laying out a page. To reduce clutter, some tabs are shown only when needed. For example, the Note tab is shown only when a Note is selected.
Some buttons on the ribbon are expandable and contain additional commands.
[:] Determine the function of the Menu Ribbon buttons:
- Point the mouse cursor to a menu ribbon button.
- A short “tooltip” description of the button will appear.
- Click on the small down arrow below the button icon (when applicable) to expand the button submenu and examine the additional commands.
Note: There is no way to delete or replace the Ribbon with the toolbars and menus from the earlier versions of Info Select. However, you can minimize the Ribbon to make more space available on your screen.
[:] Minimize the Menu Ribbon:
- Click the Customize Quick Access Toolbar button

- In the list, click Minimize the Ribbon.
- To use the Ribbon while it is minimized, click the tab you want to use, and then click the option or command you want to use.
For example, with the Ribbon minimized, you can select text in your Note, click the Note tab, and then in the Font group, click the size of the text you want. After you click the text size you want, the Ribbon goes back to being minimized.
Selector
The Selector is the area on the left side of the application window. The Selector provides a summary listing of your information. You will often want to change the width of the Selector for optimum viewing.
[:] Change the width of the Selector:
- Using your mouse, move the pointer so it is directly over the line that separates the Selector from the Workspace. You should see the mouse pointer change into a double-arrow.
- Click and hold down the left mouse button and drag the mouse either left or right.
- Release the mouse button at the desired position.
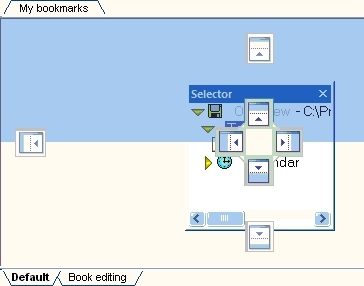
You can place Selector as a floating window at any convenient location on the screen, dock it to top, bottom, left or right side of the screen, automatically hide the Selector or completely hide it.
[:] Change the Selector position or behavior
- Click the caption of the Selector window
 and drag it to the desired position.
 - If you want to dock the Selector window to top, bottom, left or right position, position the mouse cursor while dragging the Selector window onto one of the docking markers. The area where the Selector will be docked will be highlighted as shown on the image below. Release the mouse button to dock the Selector window.
- Click the X button on the Selector window caption to completely hide the Selector window, or click the
 button to automatically hide the Selector window when it is not needed.
Notes and Topics
A Note is an item used for entering free-form text and doing basic word processing. Notes appear in the Selector with a white page icon ![]() .
.
[:] Create a Note:
- In the Selector, highlight the Overview by clicking it once. New items you create are placed below the item highlighted in Selector.
- Choose Info Select Button | Note. In the Selector the cursor will blink next to the Note icon
 .
. - Create a caption for the new Note by typing the name “John Smith”. Then press ENTER. You will notice the cursor blinking in the Workspace. The Workspace is where you enter information for the body of the Note.
- Type “Sent package Fed-X on Tuesday”.
- Press ESC to finish editing.
Topics are used to organize your data.
[:] Create a Topic for your notes on Harry:
- Choose Info Select Button | Topic. The cursor will be blinking next to the triangle icon
 in the Selector.
 - Type “Harry” and press ESC.
The lines of text in the Selector are called captions. Captions are titles for your information. You can change captions at any time.
[:] Change the caption of the Note about John Smith:
- Select the Note by clicking the caption of the “John Smith” Note you just created.
- Press F2. Notice the cursor is blinking in front of the J.
- Edit the caption by typing “Client: “. Your caption should now read “Client: John Smith”.
- Press ESC to finish editing.
You can make a duplicate copy of any item in Info Select.
[:] Duplicate the Topic in the Selector:
- In the Selector, click the Topic “Harry”.
- Choose Menu Ribbon | Home | Copy to copy the Topic to the clipboard.
- Choose Menu Ribbon | Home | Paste to copy the clipboard to the Selector.
You can delete an item you no longer need.
[:] Delete the duplicate you just made:
- Highlight the duplicate Topic in the Selector by clicking it once.
- Press the DELETE key. A confirmation dialog will appear. Press ENTER or click YES to confirm the deletion.
You can expand or collapse a Topic to view or hide its contents. When you expand a Topic the triangle will point down ![]() and below the Topic you will see the contents of that Topic. When you collapse a Topic, the triangle will point to the right
and below the Topic you will see the contents of that Topic. When you collapse a Topic, the triangle will point to the right ![]() and the contents will be hidden. Although the contents are hidden, they are still retained in memory and in the Topic. If you delete a collapsed Topic, you automatically delete the items it contains.
and the contents will be hidden. Although the contents are hidden, they are still retained in memory and in the Topic. If you delete a collapsed Topic, you automatically delete the items it contains.
[:] Expand or collapse the Quick Start Topic:
- In the Selector, click the Quick Start Topic triangle icon.
Word Processing
You can use Info Select as your main word processor. In contrast to specialized word processors, you don’t have to create a separate file for each document. Instead, all the documents can be managed within the same file. Use the high-speed Search feature to search all the related documents. Info Select provides the same editing features found in standard Windows applications. Click here to learn more about word processing.
Searching
You can quickly search for any text in your data.
[:] Search for “John S”:
- Choose Menu Ribbon | Home | Search or press F5. The Search dialog box appears. In the dialog box you will see several squares. Each square represents one item of information in the Selector.
- In the key box type “John S”. As you type your search criteria, notice how some squares disappear or change color. As you type, Info Select is searching through your information. When you are finished typing, press ENTER or click OK.
- The “Filter” is now active – filtering and displaying only items that contain “John S”. All your information is still in memory, but everything else is hidden. Only the items containing “John S” will be listed in the Selector. Notice that the Filter toolbar button has turned orange as a reminder that you are viewing only filtered items. Also in the status bar at the bottom of the screen next to the date, FILT is displayed (when the filter is not active ALL is shown).
- Press the DOWN ARROW key to browse through the filtered items.
After viewing the search results, you will want to deactivate the filter and display all your information again.
[:] Deactivate the search filter and view all data:
- Click the Filter button again or press F4. To deactivate the filter and stay positioned on the selected item, expand the Filter button on the menu ribbon and choose View All at Current or press Shift+F4.
Use Topics to organize your information (e.g., “Things to purchase”, “Hot Items”, etc.).
[:] Create a “Hot Items” Topic to classify your data:
- In the Selector, click once on Overview to highlight it.
- Choose Menu Ribbon | Edit | Insert Topic. You will see a flashing caret in the Selector.
- Type “Hot Items”.
- Press ESC to finish editing.
You can move and organize items in the Selector by dragging items with your mouse.
[:] Move the two items created previously into the new “Hot Items” Topic:
- Using your mouse, click on “Harry” and hold down the mouse button.
- Move the mouse pointer so the two triangle markers are directly at the “Hot Items” Topic. The markers determine where the item will be placed when you release the mouse button. If the markers are directly at a Topic, the item will be moved into that Topic.
- Release the mouse button. This will place the item into the “Hot Items” Topic. The item disappears from the Selector.
- Repeat for “Client: John Smith”.
You can verify that the moved items are still available for viewing.
[:] View your “Hot items”: View your “Hot items”:
- In the Selector, double-click on “Hot Items” to view the items you just moved into the Topic.
Calendar
You can use the Calendar feature to schedule and view your appointments. The Calendar has three sections – the Yearly view, the Planner view and the Properties window. The Yearly view appears on the left, the Planner view is in the middle and the Properties window is on the right. The views are separated by a movable line, which enables you to increase or decrease the size of the views. When the Calendar is invoked from the toolbar button, you can resize the entire calendar by dragging the corners. You can move the Calendar by dragging its title bar.
[:] Schedule a staff meeting:
- Choose Menu Ribbon | Home | Calendar. The Calendar will now be displayed.
- Select the desired day of the month by clicking that day in the Yearly view.
- Double-click in the 10:00 am time slot in the Day view.
- Fill in the “Edit Appointment” dialog and click Save and Close button
- Press DELETE to remove the entry.
- Click the X button in the upper right corner of the Calendar to close the Calendar.
You can read more about the Calendar functions here.
Ticklers
You can set any item in the Selector as a Tickler to be automatically reminded of that item on a certain date and time. For example, you may want to set a Tickler for an e-mail message to reply to it on next Monday.
[:] To set a Tickler:
- Right-click an item in the Selector and choose Tickler… from the pop-up menu.
- Select the desired date and time and tickler options in the Tickler Manager dialog and click OK.
Database
Databases are used for storing information like names and addresses in a consistent format. Each entry in a Database is a Record and each part of a record is a field. A sample Name & Address Database is supplied with Info Select.
[:] Enter data into the Name & Address Database:
- In Supplied Topics, expand the Name & Address Database by clicking on the triangle icon. The triangle should point down. You will see the Database form in the Workspace.
- You should see an indented tri-colored bar
 below the Database representing the first Record of the Database. If you see a list of the field names instead, double-click on the first field. You are now in the Record view, which shows all the Records in your Database.
 - Click once on a Record to select it.
- If the form in the Workspace doesn’t fit your screen, drag the bar separating the Selector and the Workspace to the left with your mouse. If the form still doesn’t fit, select a smaller font size – Menu Ribbon | Home | Options | Font | Fields, Shortcuts.
- Click in the first field (Sal) in the Workspace and fill in your own name and address, using the TAB key to move between fields. (The “Sal” field stands for salutation and is used for Mr., Mrs, etc.) Each field is a separate box in the Workspace. When you are finished, press the ESC key to finish editing.
To add additional name and address Records, select the Name & Address Database by highlighting it, then choose Menu Ribbon | Insert | Record. Databases have two views — Field view and Record view. Record view lists all your records in the Selector underneath the Database. Field view allows you to rename, delete and add fields to your Database, in addition to changing the order in which information is added to fields. When you select a field in the Selector, it is also selected in the Workspace.
[:] Change the Name & Address Database between Record and Field views:
- In the Selector double-click one of the records or fields of the Database.
When a field is selected, its right-hand edge will be highlighted in the Workspace. You can move and resize fields according to your preferences.
[:] Move the Title field underneath the City field (then put it back):
- In the Workspace, click the Title field, hold down your mouse and drag the colored right edge of the Title field and position it under the City field.
- Widen the Title field by positioning the mouse pointer at the far left or far right edge and dragging.
- Resize the Title field to its original width in the same manner.
- Drag the Title field back to its original position.
Save your data
Data is saved automatically with the Auto-Save feature, which is enabled by default. Data is also saved automatically when you close Info Select. You can also manually ensure that changes to your data are saved to disk at any time.
[:] Save your changes manually:
- Click the Info Select button and choose Save.
In the Selector there are several items listed under Overview. These items are designed to help you learn Info Select and organize your data. You can browse through these items to see what Info Select can do for you. Although it is recommended that you leave most of these sample items in place, you can use, delete, change, or add to them if you wish.
You can now begin entering your own data, such as Notes taken during phone calls, ideas as they come to you, Notes from your desk, reminders, and all your other daily information. Also, begin using Info Select in place of your word processor for simple documents – the powerful search and organizing features make this easy and worthwhile.
Common tasks
Common tasks
This section offers a quick reference to common daily uses of Info Select, enabling you to begin using Info Select immediately. Remember, the left portion of the screen is called the Selector and the right portion is called the Workspace. The button in the top left corner of the screen is called the Info Select button:
![]()
[:] You are on an important phone call and want to jot down notes:
- Create a new Note by choosing Info Select button | Note ( F7). A Note icon appears in the Selector.
- Specify a title for the Note by typing the name of the person.
- Prepare to type the body of your Note by pressing ENTER. The flashing caret appears in the right part of the screen.
- Record your conversation by typing Notes while you talk.
- When finished editing press ESC.
[:] You think of a great idea and want to record it:
- Create a line in the Selector by choosing Info Select button | Topic (F11). A triangle icon
 appears in the Selector.
 - Record your idea by typing it in.
- When finished editing press ENTER.
[:] You need to make a “To-Do” list:
- Create a Topic by choosing Info Select button | Topic. A triangle icon appears in the Selector.
- Name the Topic by typing “To-Do” (without the quotes) and press ENTER.
- Prepare to enter data in the “To-Do” Topic by pressing the SPACEBAR. The triangle now points down
 .
. - Create a “To-Do” item by choosing Info Select button | Topic.
- Type a description of your first “To-Do” item and press ENTER.
- Right-click on the “To-Do” item and choose Todo from the pop-up menu.
- Select the desired ToDo priority level – Low, Normal, High or None.
- Repeat steps 4 – 6 for each “To-Do” item.
- Hide the details of the “To-Do” list by double-clicking the main “To-Do” topic to collapse it.
[:] Someone just called and you want to find all your Notes on that person:
- Bring up the Search dialog box by pressing F5.
- In the key box, type the person’s name and press ENTER. Only items referencing that person appear in the Selector – the search filter is now active.
- Browse through the found items using the UP and DOWN Arrow keys.
- Leave the search filter by pressing F4.
[:] You need to call someone tomorrow at 3pm:
- Choose Menu Ribbon | Home | Calendar.
- Select the date by clicking on the desired day in the Date Picker bar(left portion of the calendar).
- Select the time by double-clicking on the 3pm time slot in the Day view (middle portion of the calendar).
- Specify who you need to call and press ENTER.
- Close the Calendar by clicking the X in the upper right corner.
[:] You want to group all your data on Project X together:
- Create a new Topic by choosing Info Select button | Topic.
- Type “Project X” and press ENTER.
- Place all your Project X data in the Project X Topic by dragging those items in the Selector into the Project X Topic.
- Show the items in Project X by double-clicking on Project X to expand the Topic.
[:] You need to write a business letter:
- Choose Menu Ribbon | Insert | Templates | Letter. A letter template appears. (You can customize this template later.)
- Edit and add any information you need to create the letter.
- Print the letter by choosing Print on the Home tab of the menu ribbon.
Following are some common tasks in a more generalized format:
[:] Show or hide the items in a category:
- Double-click on the category.
[:] Change the order of listed items :
- Drag the items into the desired order or use the ALT+UP/DOWN Arrows.
[:] View a listed Note:
- Click on the desired caption next to the Note icon in the listing.
[:] Change a caption in the Selector list:
- Click on the caption.
- Press F2.
- Edit the caption and press ENTER
[:] Delete a listed item:
- Click on the item in the listing.
- Press the DELETE key and confirm.
[:] Save your data:
- Click Info Select button | Save or press CTRL+S.
The above are just a few examples of what you can do with Info Select.
Protect your data
Protect Your Data
IMPORTANT: Since you will store valuable information in Info Select, you must protect your work by making frequent backups to removable media (e.g. CDs, DVDs, USB flash drives, removable hard disks, etc). No computer system is 100% perfect – eventually something will fail and you won’t want to lose the data you worked hard to gather, enter, and organize. Countless inexperienced computer users neglect the extra step of making backups because they have never had a major problem before. Don’t wait till your first major loss to learn the lesson experienced users know – that frequent backups are essential.
How often to backup
There is no hard rule about how often to backup except the following. If you are willing to lose up to a day of data you should backup daily. If you are willing to lose up to a week of data you should backup weekly. And so forth.
How to backup data
The best way to backup your data is using a specialized backup utility product or the backup utility that comes with your operating system. Also, you can use the built-in backup command to create backup copies of your data files.
[:] To Backup data:
- Choose Menu Ribbon | Home | Backup…. A dialog box appears:
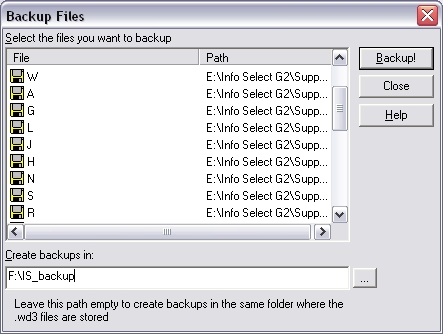
- Select the files which you want to backup from the list. You can select several files at once by holding down the CTRL key while you select files.
- In the Create backups in: box type the path to the location where you would like to create backups (for example, if you want to backup your data files to a Thumb Drive). Leave this box empty if you want to create backups in the same folder where your WD2 data files are stored.
- Click Backup! to backup data, or Close to cancel.
Alternatively you can use Explorer to copy the changed .wd3 Files in the \Program Files\Info Select subdirectory (and any other directories where you place data) to removable media. Also copy files listed under Files affected during operation. See your Windows Users Guide for further details on making backups. Be sure you are backing up the proper files and have not missed any.
There are also powerful automatic backup feature built into Info Select.
Test your backups
You may think you backed up your data – but did you really? Test to make sure your backup is working by restoring to another computer.
Restoring data from a backup
For information on restoring data from a backup see copying data files from a removable media and recovery of data.
Auto Save
For additional data security keep the Auto-Save feature enabled and use the Info Select button | Save (CTRL+S) command frequently.
Initial data you can enter
Initial Data You Can Enter
If you want to experience what Info Select can do for you, it’s important to enter 25-50 items of your own. Collect your information and enter each item as a separate Note or Topic. Enter notes from your desk, data from business cards, addresses from a Rolodex, “To-Do” lists, notes in file folders, or anything else you can think of. Later, you will learn how to import data from other programs into Info Select. If you do not have the time to practice, begin by entering any new information you come across – make Notes during phone calls, jot down ideas as they occur, enter reminders, or any other thoughts you might have. The more you enter, the more you will see the value of Info Select.
You can now keep all your daily information in one place – Info Select.